Monday, December 29, 2014

Happy Holidays

I hope you all had a nice Christmas and warm holiday with friends and family!  Today I am using an ornament from the Victorian Ornaments 3 set from Prickley Pear Rubber Stamps.  I cut out the ornament with the matching Ornament die.  I colored the ornament with Copic Markers.  Then I punched a small hole and treaded a gold cord to hang the ornement.  I stamped the sentiment from the same stamp set on light decorator paper.  Die cut the lacy border from Cheery Lynn designs.  More inspiration can be found on the PPRS blog!  Wishing you a Happy New Year!

Tuesday, December 23, 2014

Jingle Bells

Wishing you a warm winter Holiday!  Here is the Winter sled from Prickley Pear Rubber Stamps.  I colored it with Copic Markers in the soft Pastel colors.  Then I used the Removeable Tape technique to add the sponging around the image with Distress Ink.  I adhered it over some festive, holiday paper.  Then I stamped the small Winters Lovebirds onto white card stock and cut them out.  I popped them up over the Washi tape strip.  Then I finished the card with the sentiment from the Snowflake Inserts stamp set and some Candi.  Hope you have a check to see the incredible cards the the Design Team created for you to enjoy on the PPRS blog!  Happy Holidays!!

Monday, December 15, 2014

Merry & Bright

Only 10 more days until Christmas, so we wish you a Christmas that is Merry and Bright!  Today, I am using the Lamp Post from Prickley Pear.  I stamped it with the VersaFine ink pad to give it a more solid, and dark impression.  Then I added a bit of yellow glitter in the lamp for the warm glow.  I then used my removeable tape to mask a frame around the image as I sponged distress ink.  The mini Poinsettias are cut with the Poinsettia leaf die and the Holly vines are dies from Cheery Lynn Designs.  Finally, I made a banner after I stamped the Merry & Bright sentiment.  You will find more holiday inspiration on the PPRS blog!

Saturday, December 13, 2014

Border Die Scraps Tutorial

Have you ever cut out paper from dies, then when you look at the scraps think..."That looks like..."? Well that's what happened to me when I was cutting out some barbed wire borders from the Cheery Lynn die.  I saw the scraps and thought they could be tree trunks.  So here is a winter scene that I created with my scraps. I added the Pine Branch Die and the Deer stamp from Prickley Pear Rubber Stamps to complete the scene.

 Here is what the paper looked like once I cut out the borders:
I used the barbed wire on my original cards, then used the scraps to create my winter scene above!
Another example of paper scraps is in this card sample...
These fancy rick rack borders were the scraps from the lacy border die that I cut out for another card.  These looked too nice to throw away, so I used them on this card.  I then used Effie as my main image and the Many Thanks for the sentiment.  Both stamps are also from Prickley Pear.

Below is the borders and scraps that were created when cutting out the lacy border.
Actually...this would even make a neat background using all the pieces and scraps!  So next time you are busy cutting out borders with dies, see what your scraps look like.  They may just make a really cool accent on your next card!

Monday, December 8, 2014

Pure Innocence

It's hard to believe we are into December and Christmas is just around the corner.  Today, I am using the Child with Lamb stamp from Prickley Pear Rubber Stamps.  I color him with Copic Markers.  Then I used the removeable masking tape to frame the image. Then I sponged around the edges with Gathered Twigs Distress Ink.  I cut out the poinsettias with the Poinsettia Leaf die and then stamped the Poinsettia onto the cut flowers with Aged Mahogany Distress Ink.  The leafy die is from Cherry Lynn.  The Let Heaven and Nature Sing sentiment is also from Prickley Pear.  There are more beautiful cards on the PPRS blog, so be sure to check them out!

Tuesday, December 2, 2014

Prickley Pear Holiday Sale


Hope you all had a wonderful Thanksgiving and are recoving from you turkey dinners!  Black Friday and Cyber Monday are finishing up...but we have a sale for you for two full weeks!  It's the perfect time to get your holiday images and images for all the stamping occations in the new year!

You can take advantage of the sale at The Stamp Shoppe or order online.  We have lots of stamps available in the store.  Come in soon for the best selection!

Monday, December 1, 2014

Autumn Days

Wishing for a few of those Autumn days along with the Thanksgiving holiday, caused me to make a card with the chipmunks at play.  This is an adorable stamp from Prickley Pear Rubber Stamps.  I colored it with Copic Markers.  Then I used the small Chipmunk with Acorn and the Fall Leaves as accents for the card.  These Fall Leaves have a matching die to make it easy and quick to cut out.  Then the saying about the Dancing Leaves was the perfect sentiment for this image.  For more Holiday inspriration, check out the PPRS blog!

Monday, November 17, 2014

Winter's Scenery

Saturday we had Make and Takes featuring Prickley Pear Christmas stamps.  Here is one of the cards we made with the Reindeer Kisses stamp.  I colored the deer with Copic Markers, then cut it out with an oval die.  Finally I sponged around it with Stormy Sky Distress Ink.  The Bare Tree is a die cut from Prickley Pear and the sentiment is from the Snowflake Inserts Stamp set.  Don't forget, there are more inspiration to be found on the PPRS blog too.  Happy Winter!

Monday, November 10, 2014

Winter's Reflection


With our first snowfall of the winter season yesterday, I thought that this Winter's Reflection image is perfect for today.  This stamp is a new from the Prickley Pear Rubber Stamps Holiday release.  I love the images of other deer stamps that they carry and would be perfect along with it.  The papers are from Paper Loft and have the woodsy, masculine mood to them...perfect for this forest scene.  The sentiment was from a clear set and was cut out with an oval die.  The small pieces of holly were cut from a larger holly leaf die from Cheery Lynn.  Check out more holiday samples on the PPRS blog.  Keep warm and drive saftely...it's that time of year!

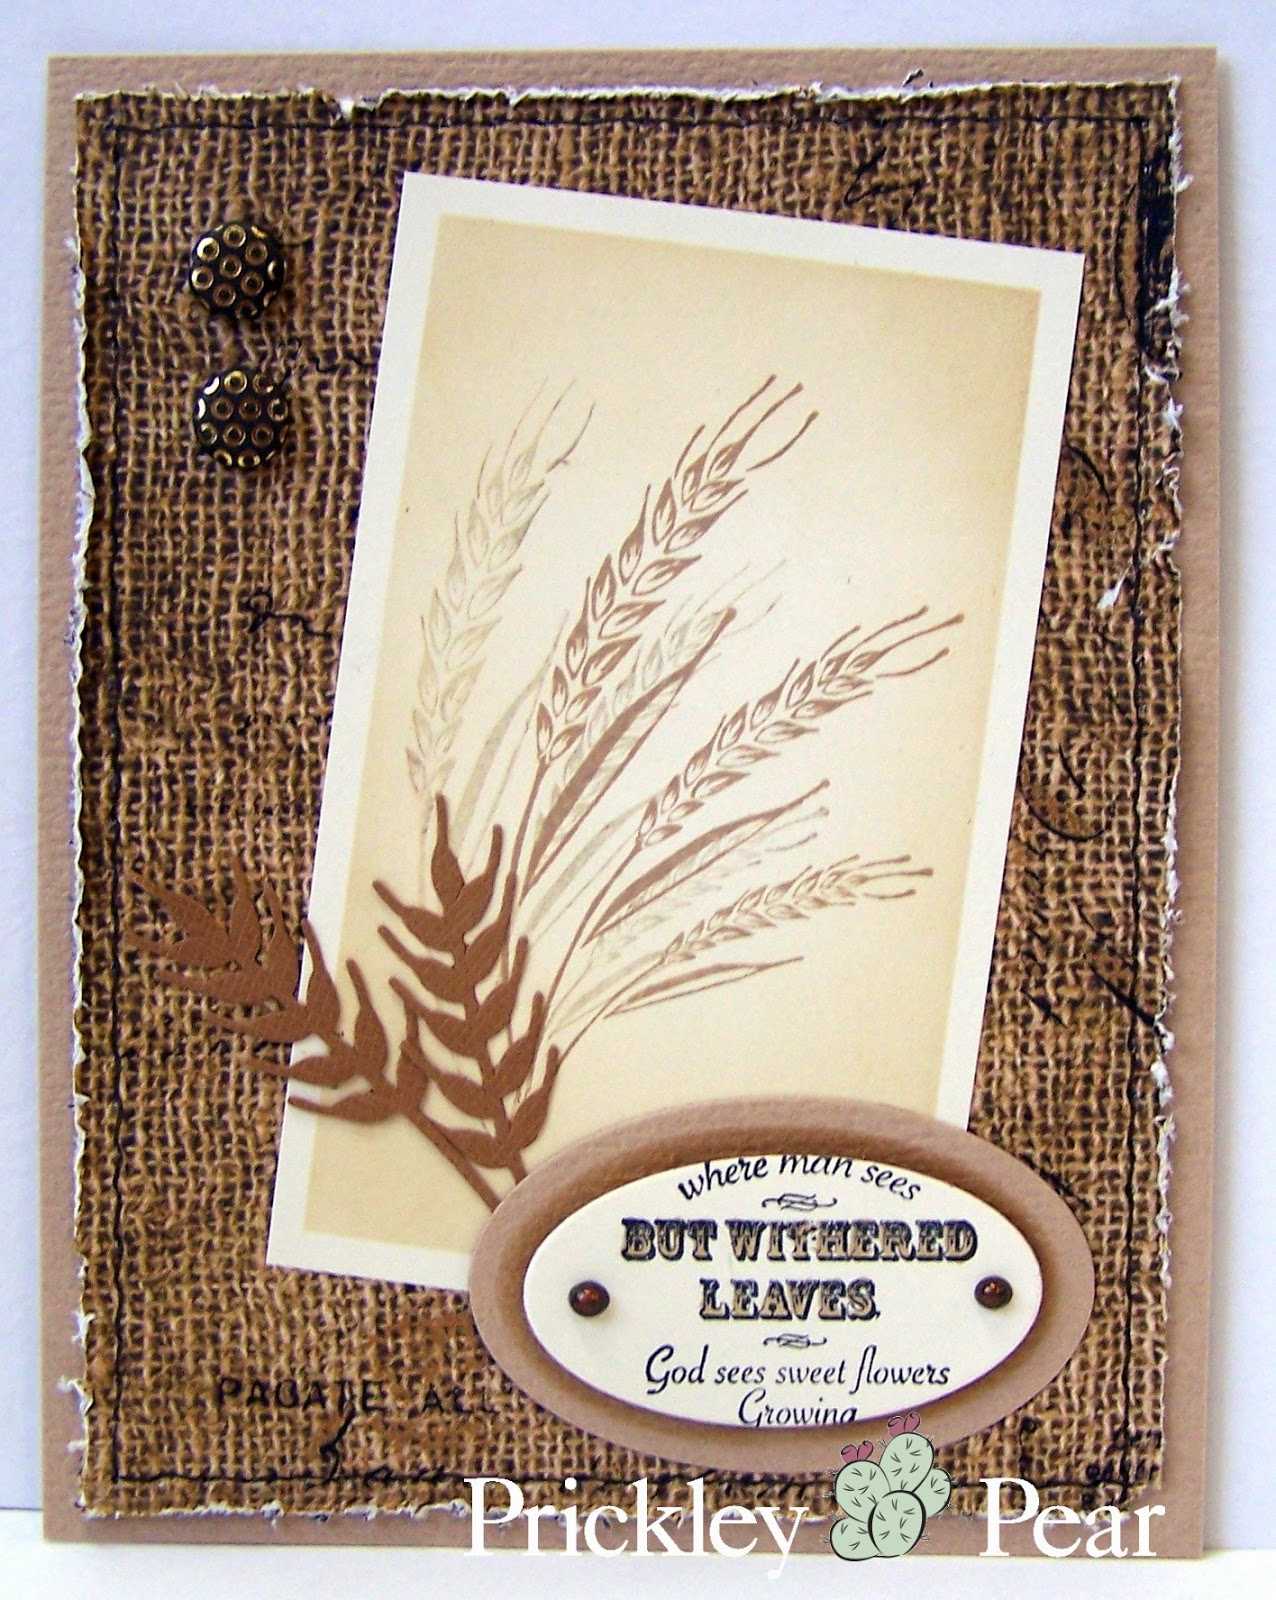
Monday, November 3, 2014

Withered Leaves

Today I am using the Wheat Stalks from Prickley Pear Rubber Stamps as my main image.  It is the season of falling leaves and harvest, so what a perfect way celebrate the season.  I stamped the wheat with Gathered Twigs distress ink.  Then I used my removable tape technique to frame the kernels of grain.  Then I used the wheat die from Cheery Lynn for another accent for the theme.  Finally I finished the card with the sentiment to remember that God sees things so much differently than we do and aren't we thankful for that.  See what other seeds of inspiration has been sown on the PPRS blog.  Hope you have a happy fall!

Monday, October 27, 2014

Happy Halloween!

This week I am using the Halloween Scribble Kitty for my main image.  This was a new fall release stamp from Prickley Pear Rubber Stamps.  I colored the image with Copic Markers, then trimmed down the white paper.  Next, I placed Removeable Scotch tape around the edges and the corners of the paper and sponged the paper with Gathered Twigs Distress ink.  Then I removed the tape and you now a framed image!  I added Candi to the corners for an added accent.  The background of the card uses Bo Bunny decorator paper, washi tape, and the Spiderweb Gate die. See more wonderful creations on the PPRS blog and I hope you have a Safe and Happy Halloween!

Monday, October 20, 2014

Halloween Greetings!

Halloween is fast approaching and here is a friendly-spooky card to help you celebrate!  I am using the Falling Pumpkins stamp from Prickley Pear Rubber Stamps.  I colored the jack-o-lanterns with Copic markers, then sponged the background with Weathered Wood and Black Soot Distress inks.  The sentiment was stamped onto a white banner and the Small Scribble Kitty was stamped onto another white paper and fussy cut.  Then I popped the kitty onto the banner.  I used the barbed wire die for a bit more of a creepy accent and added some washi tape with the Halloween decorator paper. So snuggle up with a cup of hot cocoa and check out more inspiration on the PPRS blog!

Monday, October 13, 2014

Fall Flower Display

It's that time of year with pumpkin patches, corn mazes, and colored leaves.  Today I am using the Daisies in Boot stamp from Prickley Pear as my main image.  I colored the flowers in fall colors and cut out the image with my Scan N Cut machine.  I cut out the Scallop Oval from Prickley Pear and while the die was still over the paper, I sponged the paper with Frayed Burlap.  Once the image was popped up onto the oval, I cut out a Flourish and separated it into two pieces.  Then I adhered the pieces behind the boot.  The background papers are from Bo Bunny.  The sentiment was form the Flourished Oval stamp set...and of course...I made a banner for my greeting!  Then popped on two Candi accents and my card was complete.  Meet the new design team on the PPRS blog today!

Tuesday, October 7, 2014

Wisconsin Fall

I think fall is here to stay in Wisconsin, so it's time to pull out those fall stamps.  Today I am using the Oak and Maple leaf clear stamp set from Prickley Pear Rubber stamps with the matching die.  I used lots of different elements on this card.  First I pulled out some decorator paper.  Then I used some decorator washi tape and ric rac washi tape. The doily and frames that I used behind my leaf were the Scalloped Circle die and Scallop Circle Nesting die...both from Prickley Pear Rubber Stamps.  I added the Thank you sentiment from the stamp set and made it into a banner.  It still needed a little bit more, so I added the green swirl that I cut out with the flourish die.  And of course...some candi!!  Be sure to head on over to the PPRS blog for more great cards from the Design Team!

Monday, September 29, 2014

Poinsettia Blossoms

This Poinsetta Blossoms stamp is one of the new Prickley Pear Holiday stamps.  I love the festiveness of these beautiful flowers.  The first poinsettia is cut out in a square, but with the petals hanging off the frame.  The second Poinsettia is cut out and popped up onto the card.  The sentiment is from the Victorian Ornaments 3 stamp set.  These clear sets have many small and perfect sentiment to add to the front of cards.  Check out more beautiful samples on the PPRS blog.

Monday, September 22, 2014

Dia de Muertos

Dia de Muertos means Day of the Dead.  This is a Mexican holiday to celebrate and to remember those that have departed.  This holiday is celebrated on November 1, which I know is still a few weeks away.  In honor of that holiday, here is a card that uses the new Cats 2 stamp set along with the Pumpkin die and stamp set.  The fall colors that I used on this card go with the autumn season more that is used for the holiday.  Most costumes during this event are very colorful and bright. Even though this isn't a holiday we celebrate, it is nice to often remember those that were special to us and have past on.  So wishing you a happy fall and bountiful harvest! Don't forget to check out the PPRS blog!

Monday, September 8, 2014

Checking His List

Here's another card using the Checking His List stamp from Prickley Pear Rubber Stamps.  Because this is a smaller size stamp, it lends itself to more of a collage looking card.  I like the ability of adding lots of extra accents to a card to add interest.  I made a small tag with the image, a banner with the sentiment and then I used the Poinsettia die and Holly leaf dies for accents.  The embossed circle was cut out using the Scallop Circle Nesting die from Prickley Pear and then sponged with Pumice Stone Distress Ink.  The banner has embossed lines using the ScorBuddy and then sponging with the Distress Ink.  We are back to our Monday Inspirations, so check out the PPRS blog!

Wednesday, September 3, 2014

Naughty or Nice?

Hope you enjoyed seeing our creations for the last two days!  But we aren't finished yet...We are here for one more day of inspiration.  If you are following the hop you have come from Michelle's blog.  

Today, I am using the FF0177 Santa Checking His List stamp from the Prickley Pear Holiday Release.  I colored him with Copic Markers.  Then I used removable tape around the box and sponged the inside with Pumice Stone Distress ink to create a vintage look.  Then I removed the tape and matted onto a piece of red card stock.  Then I distressed the edges of the red paper.  I stamped the EE0197 Naughty or Nice sentiment onto white paper and cut it out with angles to create a whimsicle look.  I cut out different papers to make banners and I used the Scor Buddy to make the score lines, which I then sanded to make them stand out.  Finally, I cut out the Snowflake die and stamped the images in the center with the new CLR038 Snowflake Insert clear stamp set. Throw all the elements together and you have a Vintage, Christmas Collage!   The stamps and dies are now available to purchase in stores or online.


Day 3 Hop Stops
Prickley Pear
Brenda
Tracy
Maureen
Barb
Rene
Angie
Michelle
Heidi

Tuesday, September 2, 2014

Fall Flutters

Welcome to Day 2 of our PPRS blog hop.  We have lots more to show you so, I hope you enjoy what you see!

You should have come from Angela's blog.  If not, start on the Prickley Pear blog and hop along, that way you won't miss anything!

Here I am using the JJ0087 Fall Migration stamp from the new holiday release as my focal point.  I cut it out with a circle die.  Leaving the die over the image, I then sponged some Mustard Seed and Weathered Wood Distress ink on the background.  I then removed the die.  This is popped up on Bo Bunny paper.  The fancy zig zag you see is from cutting out a border die from Cheery Lynn out twice and this was the result of the "waste" piece.  It was perfect for an embellishment!  Then I used the FF0179 Harvest Flourish along the bottom with the Autumn Days sentiment.  Then I finished the card with Candi.


This is the last stop of the hop for today...thanks for hopping with us!  Make sure that you commented along the way for your chance to win one of two fabulous prizes.

Day 2 Blog Hop Stops
Prickley Pear
Rene
Maureen
Tracy
Michelle
Angela
Heidi

Monday, September 1, 2014

A Cheshire Cat

.
Welcome to the first day of the Prickley Pear Blog Hop.  If you have come from Michelle's blog you are on the right track.

I am using the new CLR017A Cat 2 Clear Set.  I thought this looked exactly like the Cheshire Cat in Alice in Wonderland, so I colored him purple!  Then I added the fence for him to perch on.

The flowers are from the Spring Poinsettia clear set and cut out with the matching Poinsettia Leaf die. The leaves are cut out with the Leaf Die Set from a green decorator paper.  The sentiment is also from the Cat 2 set and stamped on a tag that is a Cheery Lynn die.


You have completed the blog hop for today!  The stamps will be available in the store on Tuesday.  
Be sure you commented on every hop post along the way for your chance to win one of two fabulous prizes.  See you tomorrow!

Day 1 Hop List:
Prickley Pear Rubber Stamps
Barb
Angie
Maureen
Brenda
Michelle 
Heidi - you are here!

Monday, August 25, 2014

Happy Camping

Here is another card that I made during my "stamping marathon".  I used the Camping tent from Prickley Pear, as my focal point of this card.  I used the pieces of the Zig, Zag Washi tape from We R Memories to add some extra embellishments.  The Hiking Boot Prints is an embossing folder from Darice.  Then I had the Flourish cut out with a Cheery Lynn Die.  The sentiment is from Prickley Pear Rubber Stamps, as well as the small Winters Lovebirds.  I love this petite stamps to add little somethings to the card...that still needs a little something:)  See more great cards on the PPRS blog!  And remember...next week Monday starts the PPRS blog hop featuring the brand new Fall/Winter holiday stamps...so check us out!

Monday, August 18, 2014

Whoo's Thankful

I had a stamping day last month with my Best Friend, Michelle.  This was one of the cards that I made that day.  Most of the elements on this card were odds and ends that I had laying on my craft table.  I love what can be created by throwing some of this and a little of that on the paper.  I also challenged myself to using Washi Tape on most of my cards that day.  Here I used the Washi tape to add some color and texture to the lower corner.  The Owl with Bird, Thanks to you sentiment and the flowers stamps are from Prickley Pear Rubber Stamps.  Check out more card ideas on the PPRS blog.  Also...there will be a blog hop starting on September 1st.  The Design Team has been working hard to make cards that will be sure to inspire you for the upcoming holidays...so stay tuned!!

Tuesday, August 12, 2014

Vintage Ornaments

I cut out the ornaments with the Ornaments die from Prickley Pear Rubber Stamps.  Then I stamped the Victorian Ornaments onto white cut out bulbs and colored them with Copic Markers. I then cut out some Holly Leaves with the die and then stamped Holly Leaves onto the cut out pieces.  These leaves are perfect to add a little more "pizzazz" to the card.  I popped up the ornaments onto the card.  Finally I stamped the sentiment onto a small tag and adhered it to the card.  The PPRS blog is the next stop for more ideas to brighten your Monday morning!

A Classic Car


Once again, time has gotten away from me and I missed my Monday PPRS post.  This summer has been going crazy fast and I am having a hard time keeping up.  Today, I am using the Ford Ranchero stamp from Prickley Pear Rubber Stamps.  I was inspired by Michelle's coloring of the vehicle, so I copied her color theme.  I used Graphic 45 decorator paper in the background with some Washi tape and thin hemp for added decoration.  The sentiment is from the Scalloped Circle Oval 5 clear set. and I cut out the fancy oval using the Flourished Oval Nesting Die.  Hope you can check out more card ideas on our PPRS blog.  Look for our blog hop featuring the New Holiday Release coming soon!

Monday, August 4, 2014

Black Capped Chickadees

Today I am using the Black Capped Chickadees stamp from Prickley Pear Rubber Stamps.  This is the first time that I colored them as Chickadees.  I love to color them as some springy Blue Birds and that works good too.  My good friend Michelle and I had a stamping day last week and we got lots of cards made.  This was one of the cards that I did.  I have been using my new Brother Scan and Cut...and love it!!  These birds were cut out using the machine.  The dies that I used are all from Cheery Lynn Designs.  Then I stamped the Birthday Sentiment onto cream card stock.  Then I used the removeable tape to mask off the edges and sponged the banner with Gathered Twigs Distress Ink.  Finally I used the Black Viva Pearls to add a bit of interest to the banner.  More creative ideas??  Check out the PPRS blog next!

Monday, July 28, 2014

Foxy Greetings

This is one of my odds and ends cards.  I stamped Sassy the Fox on white card stock and colored her with Copic Markers.  The hinge, the burlap and the lacy border dies are all from Cheery Lynn Designs.  These were in the extras that seemed to work on this card.  Then to add a few 3-D flowers, I cut out the the flowers with the flower dies, then stamped the flowers with the matching Flower Clear Set.  Then I cut out the leaves from green card stock, then stamped the Leaves with the matching clear set.  As with every week, there are more beautiful creations on the PPRS blog, so I hope you take a look!

Monday, July 21, 2014

Happy Camper

Summer is the season for camping.  These new outdoor stamps from Prickley Pear are perfect for masculine cards.  For this card, I used the tent and campfire stamps from PPRS and the pine branch die from Prickley Pear.  The images are colored with Copic Markers and fussy cut to pop up onto the decorator paper.  The sentiment is from the Dragonfly 2 Clear set. See more inspiration on the PPRS blog!

Monday, July 14, 2014

Christmas in July

On July 19th we will be having a Christmas in July, Make and Take Saturday.  The hours will be from 10:30 - 1:00.  This is a sample of one of the three cards to choose from.  The cost will be $3 per card.  The Ornamental Kitty stamp is from Prickley Pear Rubber Stamps.  I colored the image with Copic Markers.  The sentiment is also from Prickley Pear.  The Poinsettia die is from Cheery Lynn Designs.  We hope to see you on Saturday for some fun at The Stamp Shoppe in Schofield, WI.  If you want some inspiration today, see what's new on the PPRS blog!

Monday, July 7, 2014

Flower Garden

This is a beautiful clear stamp set from Prickley Pear Rubber Stamps.  It is called Vases.  There are three different vases and different flowers to put in them. So it is a mix and match set.  There are the matching Vases dies that cut out the vases quickly.  Then I used a banner and cut out the scalloped circle from the PPRS nesting die set for added interest.  Finally add some paper flowers, Candi and pink seam binding to finish the card.  Don't forget the PPRS blog for more great ideas!

Friday, July 4, 2014

Happy 4th of July!!

With trying to keep all my ducks in a row, I seemed to have lost track of a few!!  I missed putting out my weekly Prickley Pear Monday Inspiration card, so I will put it out today!  This little guy looks like he may enjoy his independence with warm weather and the American Huckleberry Fin attire.  I colored him with Copic Markers, then cut him out with a Sizzix die.  Then I used the cloud template to add some clouds in the background.  Then I repeated the clouds on the card using the Cheery Lynn cloud die.  Finally I added a banner (that seems to be my new thing) and some pearls.  Hope you have a wonderful, safe 4th of July!

Wednesday, July 2, 2014

Letterpress Embossing Tutorial


 Today I am doing a tutorial using the Cuttlebug embossing folders.  Here is my finished product using the Black Capped Chickadee stamp from Prickley Pear Rubber Stamps.  The dies are all from Cheery Lynn Designs and the sentiment is from the Scalloped Circle Oval 5 clear set.  Now this is how it's done...
 First of all, you stamp the image onto white card stock.  Then color it with Copic Markers.
 Next, ink up the raised part of the embossing folder with a dye ink.  I like to use the lighter colors for this so it doesn't take away from the image especially with the ink pressing in over the picture.  Adirandack Light ink pads work good!
Place the stamped paper into the embossing folder with the inked side over the front of the paper.  Run through your embossing machine.  Then assemble your card with embellishments and dies.

Monday, June 23, 2014

A Spring Amaryllis

Normally Amaryllises are a Christmas flower, but today I decided to make it a flower for spring.  I had this decorator paper from Basic Grey that had some pink flowers similar to the Prickley Pear Amaryllis.  I stamped the flowers onto white card stock and colored them with Copic Markers to match the paper.  Then I used the oval lace die from Cheery Lynn to cut out a pink frame.  I used the small flourish die to cut out the green vines to accent the card with some green and then finished the card with the Many Thanks sentiment from Prickley Pear.  There's more to see on the PPRS blog, so check it out!

Monday, June 16, 2014

Gather Love


I love these Starburst Daisies from Prickley Pear Rubber Stamps.  Here I used both the Large and Small Starburst Daisies to make a field of flowers.  This simple card has the flowers stamped in black on a piece of decorator paper.  Then the sentiment is stamped on a strip of white card stock and the Butterfly is cut out with the Mini Butterflies die and stamped with the Mini Butterflies 2 clear set.  I finished of the card with some self-adhesive gems.  Want more ideas?  Hope on over to the PPRS blog now!

Monday, June 9, 2014

Happy Father's Day

Father's Day is in a week and it's time to make a card for Dad.  I am using the Ford Ranchero from Prickley Pear Rubber Stamps for the main image on this card.  Then I cut out a scalloped circle with the die and embossed it with a cuttlebug embossing folder.  To add the bronze color to the diamond tread, I used the brown 3-D Stamp Paint from Viva Decor.  I used Candi, newspaper decorator paper and the hinge die cut from Cheery Lynn Designs.  If you like the old cars, check out the new 53 Chevy from Prickley Pear too.  Now hop on over to the PPRS blog for more inspiration today!

Monday, June 2, 2014

Book with Flowers

Here is another background that was created with Tim Holtz stencils and Distress products.  Then I layered the doily that I cut out with the doily die from Cheery Lynn Designs.  The Book with Flowers stamp was from Prickley Pear's spring release.  I colored the image with Copic markers and fussy cut around it.  Then I popped it up over the doily.  I cut out the flourish to place behind the paper flower and added the stamped Blobby flower for the center of the flower.  I added a bit of pink tint with the Picked Raspberry distress ink. I finished the card by stamping the Many Thanks sentiment onto a white strip of card stock.  As usual, there is more inspiration and beautiful cards on the PPRS blog, so check it out!

Monday, May 19, 2014

Paw Prints

Prickley Pear Rubber Stamps has new Sympathy for Pets sayings!  Today I am using Murphy the cute little puppy stamp that I colored with Copic Markers.  Then I stamped the sentiment onto white card stock and made it into a banner.  I stamped the small paw print onto card stock and cut it out to pop up onto the card.  Then added a strip of washi tape for a little extra accent.  Remember to get more inspiration today on the PPRS blog!

Monday, May 12, 2014

Snips and Snails...

Today I am using a little of this and some of that!  I am using the new Snail from Prickley Pear Rubber Stamps.  I colored him with Copic Markers.  Then I used some decorator paper from Basic Grey, Washi Tape, Prima Flowers, Candi and dies.  I love the PPRS clear flowers to use over the paper flowers as an added dimension.  These flowers are great to have cut out ahead of time with the die, then stamp the flower pattern you want on them.  Then you have a large selection to use when you are ready to start creating!  Washi Tape is a great accent for those corners that a bit bare.  Now hop on over to the PPRS blog for more inspiration today!

Wednesday, May 7, 2014

Today I am doing a tutorial of a simple Scenic Background using Distress Ink.  I used the Prickley Pear Gone Fishing Stamp.  Here is how it's done...
 First you use a scrap paper that has a straight edge.  Lay the paper across a piece of white card stock.  Then sponge the bottom half of the paper with Faded Jeans.  With the straight edge still in place, sponge along the horizon with Chipped Sapphire Distress Ink.
 Next, cut out a circle and place it onto the paper with it overlapping the horizon.  Then use a cloud stencil to start sponging around the clouds and the moon.  Use the Faded Jeans for the clouds.
 Remove the moon mask and sponge a cloud over the moon giving it the illusion of peeking out behind the clouds.
 With the cloud stencil still in place, use a paper that has a circle cut out of it as a mask to add a hit of yellow over the moon.  I used the Scattered Straw for this.  Finally, stamp the Gone Fishing at the bottom of the card.  I reinked the cattails to fill in along the bottom.  Then I stamped a sentiment onto a white strip of paper and placed this over the bottom of the scene.  This hides the uneven stamping along the bottom!!  I hope you enjoyed this tutorial and I will be back with another Scenic Background Tutorial in a few weeks.