Showing posts with label Viva Decor. Show all posts

Thursday, November 17, 2016

Celebrating a Birthday!!

Here's to another day of Celebrating the Riley and Company's new release!  Also, today is my Dad's birthday so...let's show you how the new Funny Bones sayings can lighten the Special day!
 This Popping out of the cake Riley seemed perfect for this cake sentiment.  Even though these are one stamp, I like to separate the sentiments and often put the punchline inside the card.
The Balloons Riley is my go to image with many of these Birthday Sayings.  Check out more of these Hilarious sayings at Riley & Company today.  They are guaranteed to light your mood and even bring a chuckle or two!  Check out more great ideas on the blog too.

Tuesday, October 4, 2016

Halloween is Coming!

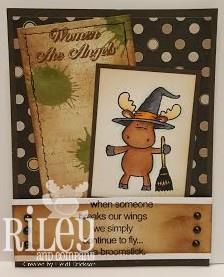
Here are two adorable Halloween Riley images.  Of course when you pair them with the perfectly fitting Funny Bones sayings...They are more than a little adorable!
 With the Standing Witch Riley, I inked the top part of the saying on a retangular paper.  Then I used the Distress Stain and with the Dauber top, I smashed it to the paper to create the splatter blob.  This was an idea I got from my extreemly creative friend, Michelle! Finally, I used Distress ink and the ScorBuddy with the ScorPal to finish the background piece.  The rest of the saying I then stamped onto a strip of white card stock.  Then I used Removeable tape with distress ink to create the banner.
This Holding Pumpkin Riley is fun to pair with the I love Halloween sentiment.  Using background paper with candy, it fits the Treat or Treat theme too!  Hope you enjoyed some of the Halloween inspiration today.  Be sure to see more great ideas on the Riley blog!

Thursday, September 15, 2016

Yummy Cupcakes!

Today I am using the Cupcake set from Prickley Pear!  These are so much fun to work with because you can mix and match the different tops with the different cake bottoms!  Then you can make vanilla, chocolate, whipped cream...different frosting...to make delicious treats! Here are a few cards to whet your appetite!


If you like these cards, we are offering a class at The Stamp Shoppe on October 6th, that includes these and one more! Also check out the PPRS blog for more card ideas from the design team!

Tuesday, September 6, 2016

Tropical Riley

Today I am using two Riley Stamps that have a more tropical theme along with two new release funny bones stamps!
 Here I stamped the Be a Pineapple sentiment and cut it apart to place Carmen Miranda between them.  I used a scrap of paper that I cut a scallop circle out of.  Laying it over decorative paper, then adding a piece of pink cardstock make a background for Riley.  Then to finish it off with some pearls I made with the Viva Decor Pearl Pen.
Here is another funny saying that was just released this month!  This Hula Sophie was perfect with this sentiment!  I stamped her on white cardstock and mounted it onto some blue paper.  Then I placed a wobbles behind the image to create motion.  Just add some palm fronds from Cheery Lynn and die cut poinsettia flowers from Prickley Pear with some Candi and it completes the card. Be sure to check out the Riley blog for more fantastic cards!

Sunday, February 15, 2015

Blog Hop Day 3


Welcome to the third and final day of our blog hop.  If you are following our blog hop, you should have come from Rita's blog. Yesterday, you saw what Little Boys are made of and today you can see what Little Girls are made of!  Edith (HH0174) is colored with Copic Markers.  After I cut the paper down to the size I wanted, I used removable tape around the four sides.  Then I used Gathered Twigs Distress Ink to sponge around the image.  I found these decorater papers in my scrap bin and thought they were the perfect choice for this image.  The lacy border was cut out with a die from Cheery Lynn Designs.  The corner is also a Cheery Lynn die cut out of silver pearlescent paper.  Then I used the flower die from PPRS and the matching flower clear set.  The center of the flowers were made with a cream pearl pen.  Finally I used some cream dotted Candi to finish the card.

Now to continue on the hop, go to Michelle's blog! Contine to leave some comments...we've enjoyed hearing from you.  If  haven't seen the blog hop prizes, here it is:
Thanks for stopping by!

Friday, February 13, 2015

Blog Hop Day 1...Spring Release!


Spring is coming and we want to show you what's new from Prickley Pear Rubber Stamps.  Today is the first day of the blog hop.

 If you came from PPRS blog, you are right on track.  From here, you will head on over to 

I am using the HH0176 Singing bluebirds with the DD0228 Little Bird Script.  For the accent behind the image, I used the new D052 Flourished Circle die.  I just cut it in half and glued it to the ends of the oval.  Then I used a piece of cream cardstock to fill in the gap.  Just another way to use this die.  Around the decorator paper, I used the ScorBuddy to score lines 1/4" around the four sides of the paper.  Then I sanded the lines to make them pop.  Finally I added pearls with the Viva Decor Pearl Pen.

Leave a comment on each blog along the way for a chance to win some of the new Spring Release!  The more you comment, the greater your chance to win!  Here is a peak at what you can win:

Monday, August 4, 2014

Black Capped Chickadees

Today I am using the Black Capped Chickadees stamp from Prickley Pear Rubber Stamps.  This is the first time that I colored them as Chickadees.  I love to color them as some springy Blue Birds and that works good too.  My good friend Michelle and I had a stamping day last week and we got lots of cards made.  This was one of the cards that I did.  I have been using my new Brother Scan and Cut...and love it!!  These birds were cut out using the machine.  The dies that I used are all from Cheery Lynn Designs.  Then I stamped the Birthday Sentiment onto cream card stock.  Then I used the removeable tape to mask off the edges and sponged the banner with Gathered Twigs Distress Ink.  Finally I used the Black Viva Pearls to add a bit of interest to the banner.  More creative ideas??  Check out the PPRS blog next!

Friday, July 4, 2014

Happy 4th of July!!

With trying to keep all my ducks in a row, I seemed to have lost track of a few!!  I missed putting out my weekly Prickley Pear Monday Inspiration card, so I will put it out today!  This little guy looks like he may enjoy his independence with warm weather and the American Huckleberry Fin attire.  I colored him with Copic Markers, then cut him out with a Sizzix die.  Then I used the cloud template to add some clouds in the background.  Then I repeated the clouds on the card using the Cheery Lynn cloud die.  Finally I added a banner (that seems to be my new thing) and some pearls.  Hope you have a wonderful, safe 4th of July!

Monday, June 9, 2014

Happy Father's Day

Father's Day is in a week and it's time to make a card for Dad.  I am using the Ford Ranchero from Prickley Pear Rubber Stamps for the main image on this card.  Then I cut out a scalloped circle with the die and embossed it with a cuttlebug embossing folder.  To add the bronze color to the diamond tread, I used the brown 3-D Stamp Paint from Viva Decor.  I used Candi, newspaper decorator paper and the hinge die cut from Cheery Lynn Designs.  If you like the old cars, check out the new 53 Chevy from Prickley Pear too.  Now hop on over to the PPRS blog for more inspiration today!

Monday, April 7, 2014

Stencil Backgrounds

A few Saturdays ago, we had a demo at The Stamp Shoppe that was using the new stencils by Tim Holtz and Memory Box.  We used the Distress Paints, Distress Stains, Tattered Angels Glimmer Sprays, and Distress Ink Pads to create these fun, bright backgrounds.  Last Monday, I made several cards using these pre-made backgrounds.  On this card, I used the Prickley Pear Black Eye Susans and the Mini Butterflies Clear Stamp Set.  The flowers I colored with Copic Markers, but the butterfly I used the Distress Ink to add color.  Then I used the ScorBuddy and made score lines onto the corners of the decorative background paper.  Once the score lines were made, I used the fine line sandpaper to whiten the lines.  The flowers are popped up in front of the die cut doily from Cheery Lynn Designs and Gems from Couture Creations were added to the sentiment.

And one more announcement...

Be sure to join us next week to see the new Spring release from Prickley Pear.  The Design Team members will be doing a hop to show you some beautiful cards using these wonderful new stamps.  For now, check out the PPRS blog for inspiration today!

Monday, March 24, 2014

Welcome Spring

With the warmer weather here and the snow melting a little each day, a feeling of spring is in the air!  Today I am using the Vintage Angel from Prickley Pear Rubber Stamps.   I didn't want here to be an angel for this card, but a beautiful lady gathering flowers, so I cut off the wings and made her what I wanted.  I used parts of the doily dies from Cheery Lynn for the background.  With these larger doily dies they require more effort to get the entire thing cut out.  Sometimes I don't get every thing cut out the way it should be, so I use the parts that are good and cut off the parts that aren't.  This creates a unique look of it's own.  I added a few score lines with my ScorBuddy and sanded the lines.  Then I added the Welcome Spring sentiment and a few pearls.  Now check out more wonderful ideas from our very creative design team  on the PPRS blog!

Thursday, March 20, 2014

March Madness

This month is the month to make things that are outside our comfort zone.  I have been having fun creating Artsy backgrounds with Stencils and different Distress Products from Ranger.  Here I used the Crusade background stencil with the Picked Raspberry Distress Paint in the upper right corner.  Then I used the Mosaic Swirls with the Broken China Distress Stain in the lower left corner.  Then in the middle of the paper I used the Pop Rectangle Stencil which I sprayed with a purple Glitz spray.  Next, I used the Picked Raspberry, Wild Honey, Broken China and Chipped Sapphire Distress Inks to color the entire paper.  Once the paper is covered with a rainbow of color and textures, then I sprayed it with water to add the water spots.  I stenciled the Shasta flower with purple 3-D Paste by Viva Decor.  The hummingbird was pasted with the White Matte paste and when it was dry, I added some of the 3-D Glitz Paste for color and sparkle.  I used the Glossy Black paste to emboss the Birthday sentiment.  Be sure to see more "mad" designs...

Saturday, March 1, 2014

PPRS Mini Tags Day #2

 Now that you have your PPRS Minis all made ahead, you can grab some elements and put the card together.  I like to have several of the flowers cut out and stamped  ahead of time too.  That way when I am ready to assemble a card, I just have to color them the way I want to and add them. 
I stamped my PPRS mini with the Spring Scalloped Circle set and the Small Cameo.  I like to stamp the solid stamps with VersaFine, because it gives it a more solid image.  I cut out the mini with the Scalloped circle die and the Scalloped Circle Nesting dies.  Then I have an embossed background paper, a cut out Border, leaves, candi and pearls to finish the card.  So go ahead and make some Minis.  Then you can have them on hand to make some quick and simple cards when you need them!

Thursday, February 20, 2014

Things that Flutter!

Today I am again following the Dreamweaver February challenge.  What are things that flutter?  Birds, Hearts, Leaves...so I decided to use some of each!  First I used the Ruffled Heart stencil.  I embossed the heart with my cuttlebug and the Rubber Mat.  I left my stencil over the paper and used a large stencil brush and pink pigment ink to color the heart.  I removed the stencil and placed the birds and blossoms stencil over the heart.  I got out my old Light Box and a styllis to dry emboss the bird and the flowering branches.  I then left the stencil over the  image and colored the bird, flowers and leaves with pigment ink.  I also used the Picasso stencil shield to color only what I wanted colored.  I cut out the leafy branch with the new Dreamweaver die used only the part of the cut out to decorate my card.  See more beautiful creations the will be sure to set your heart a flutter!

Saturday, January 25, 2014

PPRS Blog Hop Day #1


Welcome to our Spring Release Blog Hop. You may have come from the PPRS blog!  We have lots of fun stuff to show you, inspiration...and some awesome prizes!
Here are two of my creations:

 
 I am using the new Daisies in Boot stamp.  This is such a gorgeous stamp and can be used in so many ways! These stamps will be available soon!  Now hop on over to Angela's blog for more peeks at what is new!

Also don't forget to leave some comments along the way for you chance to win prizes. Prickley Pear is giving away two prizes, valued at $75 each.  The more comments you leave, the better your chance to win!  We love to hear what you like about the release and what you enjoyed about our creations.  Now here is a peek at what you could win:
Be sure to join our hop for the next two days for more inspiration and chances to win!

Monday, January 6, 2014

Winter Sled

I used the Winter Sled on this card as the center piece, then added a little red doily accent from Cheery Lynn to brighten up all the brown tones and to make the ribbon pop.  Then I added some Candi and a sentiment  to complete the card.
 Here, I am using the Winter Sled that I stamped on a piece of white card stock, then colored with Copic Markers.  Then I used the removable masking tape technique to sponge a frame around the sled.  The red strip is embossed with a Darice Embossing folder and accented with lace strips that were cut out with Cheery Lynn dies.  I added my sentiment to a piece of cream card stock, then popped it up and added some bronze pearls from Viva Decor.  It still needed something else...so I add a little mistletoe to the sentiment for a little added Holiday Love!  Finally, I add some glitter glue to the berries to make them pop!  See some more Winter ideas from the PPRS blog.  Have a Warm and Happy New Year!

Monday, December 30, 2013

Merry Holidays


I know Christmas is past, but many of you are thinking about what you are going to make for cards next year!  With the hustle and bustle of the holidays, it's nice get a little ahead.
 In the card I am showing today, I used the Poinsettia clear stamp set from Prickley Pear Rubber Stamps for accents on the cards.  For this card, I stamped the Presents on white card stock and colored them with Copic Markers.  Then I cut it out with an oval die.  Because the background paper is quite busy, I added a strip of brown paper to break up the design.  Then I cut out the Poinsettias with the matching die, stamped the flowers and then cut them out with Copic Markers.  After I layered the flowers, I popped them over same holly springs that I did cut with the Cheery Lynn die.  For more inspiration...go to the PPRS blog!

Monday, December 23, 2013

Embellished Reindeer

With this simple holiday card, I stamped the reindeer onto kraft paper with brown VersaFine ink.  Then I sponged around the oval with Gathered Twigs Distress Ink.  This time I cut the Poinsettias from designer paper, then stamped the flowers with the Aged Mahogany Distress Ink.  I didn't layer the flowers, but left them one dimensional.  I liked the vintage feel of this Christmas card, but I felt it needed to be lightened up a bit, so I add the lace that I cut out with the Cheery Lynn die. Finally I added the sentiment and the pearls.  I hope you all are having a wonderful holiday season.  See more beautiful ideas on the PPRS blog.

Monday, December 16, 2013

Tis the Season

Today, I am using some of the new Christmas designs from Prickley Pear.

First, I have the Hanging the Ornament stamp that I colored with Copic Markers.  I cut her out and popped her up over the To be Jolly background.  Then I added a piece of doily, a die from Cheery Lynn and a banner.  Finally, I added the pine bough, for something to hand the ornament on.

Here is a simpler version of the Hanging the Ornament stamp.  It was simple stamped on white card stock, then matted on red and green oval dies.  I then added a sentiment onto a banner and sponged some Frayed Burlap Distress ink on it to add some color and details.  Finally, I added some gold pearls for a little more embellishment.  Check out some more Holiday Cheer on the PPRS blog.
Have a Happy Holiday Season!


Monday, December 2, 2013

Carolling

It's after Thanksgiving and Christmas music is in the air.  I am using the Bundled for Winter stamp from Prickley Pear Rubber Stamps for my image on today's card.  This is such an adorable stamp.  I colored them in Copic Markers.  Then I used the Decorative square from from Cheery Lynn Designs.  The Fa La La La La stamp is also from PPRS and cut out with a label die from Cheery Lynn.  Poinsettia and holly accents dies are also from Cheery Lynn Dies.  Hop on over to the PPRS blog for more inspiration.