Friday, May 31, 2013

Cheery Lynn and PPRS Promotion Day #6

I am having so much fun with these new dies from Cheery Lynn along with the beautiful new stamps from Prickley Pear Rubber Stamps.  These two compliment each other!  Today I am again using the B308 City Girl Border die with the Carousel Horse stamp.  The I used the new B310 Shasta Daisy die to create the 3-D flowers for extra dimensional embellishments along with the Mini Fanciful Flourish.  I used some Candi for the flower centers.  The tag die is also from Cheery Lynn and the sentiment is from one of the clear sets from PPRS.  Many of these dies are in stock at The Stamp Shoppe.

Just a reminder to be sure to leave comments on the PPRS blog along with the Design Team blogs.  The more you comment, the greater your chance of being a winner of $25 worth of product from Prickley Pear Rubber Stamps!  There are wonderful samples on the PPRS blog and the Cheery Lynn blog, so check them out!

Thursday, May 30, 2013

Cross Promotion with Cheery Lynn Designs Day #5

I'm back with more samples using some of the new Cheery Lynn Dies.  In both of my projects, I am using the B301 Hearts Flourish Placecard #3 die.  In this first card, I am using the Prickley Pear Flourished Graduate stamp.  I then cut out two of the flourish placecards and cut off the front.  Then I cut of the fancy edge.  To cover where the two piece came together, I cut out two of the B308 City Girl Edgers and adhered them to a strip of blue cardstock, then adhered the strip over the center.  Then I placed my image over the front of the card.  I added some candi to complete the card.
 
Don't forget to check out the PPRS blog!  Leave comments for your chance to win PPRS products.  The random drawing will be at the end of the week and there will be two winners chosen!!  Also check out the Cheery Lynn Blog and see what their design team has done with PPRS stamps!  There is lots of inspiration at your fingertips!!
Then I used the place card as a treat topper.  Yes, the challenge for the Dreamweaver blog is still on tiny treats for this week yet, so I thought that this is a perfect way to make a topper for my treat bag.  I used stencil paste to make the long stem rose on the cellophane bag.  After the paste was dry, then I layed the clean stencil over the pasted rose and used pigment ink to add color to the paste.  Then I pasted the sentiment with pearlescent paste on the treat topper. Once the paste was dry, I sponged a little pink ink around the words to make them more visible.  Add some pastel M & M's to the bag, close it up and staple the topper to the bag and it's ready to give out at a bridal shower or to put on the tables at the reception hall!  I still have yet to use this versatile die for the intended purpose, but it works for so many things!

Check out more tiny treat idea starting at the Dream It Up blog...


Wednesday, May 29, 2013

A Heartfelt Lighthouse

I am using a lighthouse from the Balmy Breeze Collection on this card.  I used on of the ATC panels from the Paper Collection to make the frame for the lighthouse.  Then I framed the image with different pattern papers from the paper collection pack.  I added some Hemp and pearls to finish the card.  Visit the HC blog for more beautiful creations to be inspired by! 

Tuesday, May 28, 2013

Cheery Lynn Designs and PPRS Cross Promotion Day #3

Welcome to Day 3 of the Cross Promotion of Cheery Lynn Designs and Prickley Pear Rubber Stamps.  I hope you are enjoying all the fun ideas of the new dies and stamps, as much as we've had fun creating with them!  Today, I am using the B308 City Girl Edger Die from Cheery Lynn.  I cut out two of the borders, then used my Scor Buddy and Scor Bug to create the stitching along the edge of the lacy border.  I stamped the new Fears & Dreams stamp from Prickley Pear on cream cardstock and sponge around the edge with Distress Ink.  Then I used a fine line black pen to make the squiggly lines around the sentiment.  I cut out the Butterfly with the PPRS butterfly die, then stamped the flourished butterfly over the cut shape.  Then I used Distress ink to color the butterfly, then spritzed it with Shimmer Mist to add sparkle to it.

Be sure to leave comments along the way, for your chance to win product from PPRS worth $25.  There will be two lucky winners and you can only win if you leave a comment!  For lots of inspiration, check out both the PPRS blog and Cheery Lynn blog!  Have a wonderful day!

Monday, May 27, 2013

Cheery Lynn and PPRS Cross Promotion Day #2

Today I am using the DL242 Kissimmee Doily Die from Cheery Lynn Designs again.  This tie I am using the entire die with the angel wing piece.  Once I adhered the doily to the scallop edge, I cut the doily in half and adhere a strip of pink cardstock between the two halves.  This allowed me to "stretch"  the die.  Then I stamped the Dove looking Down from Prickley Pear onto a white piece of cardstock and colored it with Copic Markers.  Then I cut out the B285 Friend die out of blue cardstock and adhered it to the card.

Be sure to leave comments on the PPRS blog and the Design team blogs for your chance to win PPRS products.  At the end of the week, two lucky winner will be randomly chosen to win a fabulous prized of PPRS products valued at $25 each!!

Check out the PPRS blog to follow the links to all the Design Team members that are creating for you today, then hop on over to the Cheery Lynn blog to see what they have created with Prickly Pear Rubber Stamps!  Thanks for stopping by.

Sunday, May 26, 2013

Cheery Lynn Designs New Release Day #1

This week, Prickley Pear Rubber Stamps is partnering up with Cheery Lynn Designs.  We will be showing the new designs from PPRS along with the dies that were just released in April by Cheery Lynn.   Today, I am using the new Boy with Fishing Pole from Prickley Pear.  I colored him with Copic Markers, then cut him out with an oval die.  I left the die over the paper and sponged clouds on the background.  Then I removed the die.  The new die that I used on this card is the Kissimme Doily.  I cut out two doilies from blue cardstock, then I cut off the parts of the doily I didn't want to use.  Then I adhered the two doilies behind the oval piece.  The background is the french lattice small die from Cheery Lynn.  It is not a new release, but one of my favorites.  This also adds some texture to the background.  Hop on over to the PPRS blog for more inspiration with these fun new dies.  Also see even more beautiful pieces on the Cheery Lynn blog.  Check back every day this week for new creations daily!

Wednesday, May 22, 2013


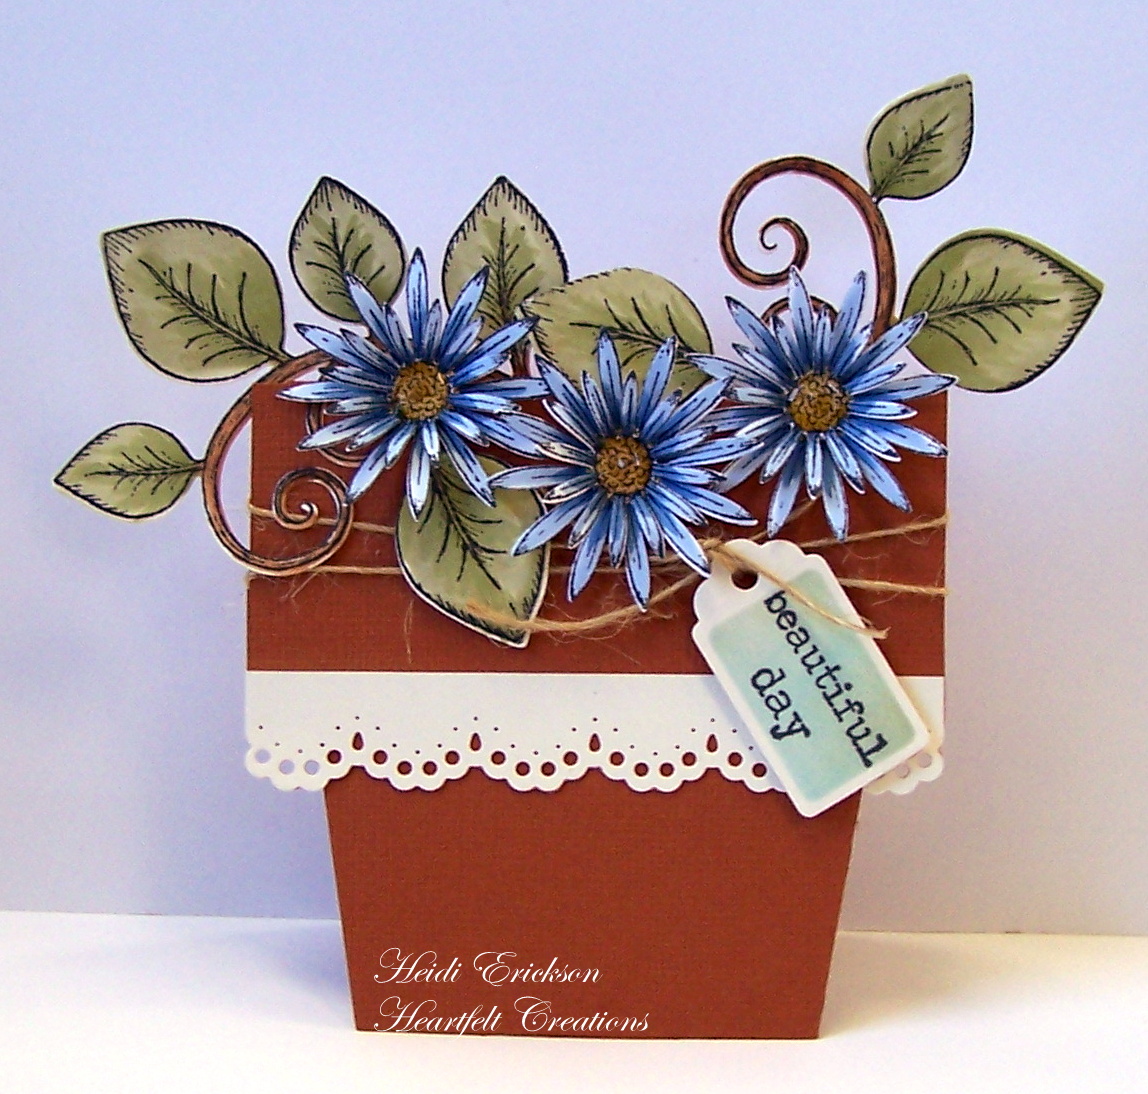
Today I am using stamps from the Sun Kissed Fleur collection.  On both of the cards, I am using the Sun Kissed borders and swirls for the main part of the card, with the individual flowers as accents and 3-D effects on the cards.  Just wanted to show how to add more depth onto the card.  On the first card I stamped the image onto a light colored piece of decorator paper, then colored it with Copic Markers.  I like how the decorator paper makes it appear as if it was stamped on fabric.  I used a ATC panel from the Decorator paper to display the image on.  Then used the Butterfly from the Sweet Serenity collections and cut out with the  Les Papallion (butterfly) die form Spellbinders.  The second card, I used the border on the peach cardstock and colored it with Copic Markers.  Then I used th decoratoro paper on the background with a strip of the same paper on the front to tie it together.  The border is from the new border die collection from Spellbinders.  The flourish is from the new Gift Ensemble die collecton.  It is a Heartfelt Creations Exclusive die.  Check out more beautiful pieces on the HC blog!

Monday, May 20, 2013

Graduation with PPRS

With the Graduation Season fast approaching, I decided that those are the cards I need to be working on now!  Here I am using the Prickley Pear Flourished Graduate for my main image.  I find that the solid images work best when stamped with VersaFine Ink.  It is a fast drying pigment ink and the ink doesn't bead up on the stamp leaving a splotchy impression.  I used the Cheery Lynn background die for the background of the card.  I have made several graduation cards like this and chose the main color of the school for this piece.  Then I adhered it to a black card front.  Mounted the image on black paper, cut out the corners (Also a Cheery Lynnn Die set) and added that to the graduate.  I then used the new Graduation sentiment for the front of the card.  I just stamped the first part of the saying onto white cardstock for the front of the card, then stamped the rest of the saying on the inside!  Finally I used the Beautiful Flowers Clear set, Cheery Lynn die cut leaves, Candi and Pearl Pen to add extra embellishments to the card.  Check out the PPRS blog for more inspiration!

Thursday, May 16, 2013

Another Dreamweaver Treat

The Dreamweaver challenge theme for this month is tiny treats, gift boxes, for different occasions.  Today I am using the Heartfelt Creations Gift Box die to make this box.  I cut out the four sides from decorator paper, then adhered them together.  Then  used the 1 1/2" Scor-Tape around the box.  Then I added a strip of May Arts crocheted ribbon onto the sticky strip of tape.  Finally I added some of the Elizabeth Craft Designs Microfine Glitter to any of the exposed tape.  This adds some glitz as well.  Then for the top I used the Lotus Stencil from Dreamweaver.  I ran this lotus through my Cuttlebug machine with the embossing pad to Emboss the image.  Then I used some pigment ink from a Splendor pad and a stencil brush to add color to the flower.  I repeated this process untill I had four Lotus.  Then I cut around the entire flower of the first one.  Then I cut in a bit for the second layer, then cut in a bit more for the third layer and finally a small flower was cut out of the last Dahlia.  I used pop dots to adhere the layers together.  The leaf was made with the Maple Branch stencil.  This can work as a Bridal Shower gift, Mother's day gift or any Appreciation event!  Check out more Tiny Treat ideas from the Design Team!

Wednesday, May 15, 2013

Sun Kissed Collections

Today, I am using the stamps and dies from the Sun Kissed Flower Collection.  This collection from Heartfelt Creations is a beautiful set.  I love the new Sun Kissed flowers that are on one stamp.  Then all you have to do is use the matching flower die and it cuts the entire set of flowers at one time.  What a time saver!  Now you have several flowers to color and use on your cards and projects.  I love the tag and basket set too.  The stamps that are included in this set are so versatile.  They work well with other image in different collections!  The white doily accents are cut off from the gift box die.  You can use different elements of this die.  Of course you can make the gift box, but you can also use the sides for lacy borders and the ends a I did here.  The Sun Kissed Paper Collection pack has gorgeous papers that are in the peach and blue hues.  They are fun and bright...just perfect for spring!  Check out the HC blog for more gorgeous samples from this collection!

Monday, May 13, 2013

Happy Mother's Day!

Hope you all had a Happy Mother's Day!  Today I am showcasing the new Love you Mom stamp from Prickley Pear.  I have found the you have the best results stamping solid images like this, with VersaFine Ink Pads.  I then added a little color with Copic Markers.  I used paper from a Simple Stories 6x6 paper pack and cut out the banner from one of the decorator pages.  The eyelet border is a die from Cheery Lynn Designs.  Then I used the new leaf border, candi and the CLR012 Beautiful Flowers clear set from Prickley Pear.   Hope on over to the Prickley Pear Blog for more inspiration!

Wednesday, May 8, 2013

Sun Kissed Flower Collection

I am pleased to introduce the Sun Kissed Flower Collection.  This Collection includes 2 dies: the Gift Ensemble die (yes you can make a fancy box with this die) and the Sun Kissed Flower die which cuts out 10 different flowers all at the same time!  The paper collection called the Sun Kissed Flower Paper collection comes in vibrant aquas and oranges and fades into light greens and yellows.  The paper pack comes in 24 sheets of 12 x 12 papers that have designs on both sides. There are 2 sheets of each design, some are dramatic; others are subdued.  There are also a wonderful selection of floral stamps to choose from; floral tags, overflowing basket, beautiful patterned backgrounds, borders and corners.

Leave a comment on the Heartfelt Creations blog by May 14th and you will be eligible to win the entire release valued at $180.91.

Thursday, May 2, 2013

Tiny Treat Box

It's a new month and a new challenge for Dreamweaver Stencils.  This month is Tiny Treats that can be used for showers, weddings, birthdays, teacher appreciation, etc.  Today I am using the pillow box die from My Favorite Things.  I cut out the box, but left it flat.  Then I layed the LJ909 Cathedral Windows Small over box and stenciled it with Pixie Dust VersaMagic Ink.  Once the background is inked onto the box, I folded the box and adhere it together.  I stenciled the LS95 Baby feet onto white cardstock with the Pixie Dust Ink.  Then I rubbed the extra ink off the stencil.  Spread the Pearlescent Paste over the  Baby Feet, then remove the stencil and allow the paste to dry.  Once the paste was dry I sponged a little more pink ink onto the paste.  Trim down the tag and round the corners.   I wrapped the blue/pink sheer ribbon from May Arts around the pillow box and attached the tag to the box with the ribbon.  Adhere a paper flower to the box and finish it with a Lilac Viva Decor Pearl Pen.  There's lots more to see...
Heidi Erickson (that's me!!)


Wednesday, May 1, 2013

Flower Pot Card

Today I am using the new Flower Pot Die set from Heartfelt Creations.  I folded the cardstock in half.  Then I used the largest flower pot die to cut the card.  Be sure to have the top of the die hanging off the fold so that it stays a card and not two individual pieces!  Then I used the leaves from the Balmy Breeze collection with the Delicate Asters.  The leaves and flowers have matching dies to make cutting them out easier.  The tag and the lacy border are dies that are also included in the die Set.  Be sure to check out the wonderful projects on the Heartfelt Creations blog and to see the who joining us on the Design Team!