Showing posts with label candi. Show all posts

Thursday, December 15, 2016

A Prickley Pear Christmas

Today I am featuring the Prickley Pear Clear Stamp Sets and the matching dies.  This Winter's Butterfly card used the Butterflies Clear Set.  The background was embossed with the Darice Snowflake embossing folder, then using Distress inks create the colorful background.  The Butterfly was cut out with the butterfly die, then stamped with the image.  It was colored with the Distress inks as well.  Then I used the clear Stardust gel pen to add some glitter highlights to it.

This next card uses the Cardinals Clear stamp set. Cut out the cardinal from decorative red paper with the die then stamp the cardinal onto decorative paper.  Place cardinal on more decorative paper with the pine branch die.  Add some Candi to finish it off!

Check out more ideas on the PPRS blog today!


Thursday, September 15, 2016

Yummy Cupcakes!

Today I am using the Cupcake set from Prickley Pear!  These are so much fun to work with because you can mix and match the different tops with the different cake bottoms!  Then you can make vanilla, chocolate, whipped cream...different frosting...to make delicious treats! Here are a few cards to whet your appetite!


If you like these cards, we are offering a class at The Stamp Shoppe on October 6th, that includes these and one more! Also check out the PPRS blog for more card ideas from the design team!

Tuesday, September 6, 2016

Tropical Riley

Today I am using two Riley Stamps that have a more tropical theme along with two new release funny bones stamps!
 Here I stamped the Be a Pineapple sentiment and cut it apart to place Carmen Miranda between them.  I used a scrap of paper that I cut a scallop circle out of.  Laying it over decorative paper, then adding a piece of pink cardstock make a background for Riley.  Then to finish it off with some pearls I made with the Viva Decor Pearl Pen.
Here is another funny saying that was just released this month!  This Hula Sophie was perfect with this sentiment!  I stamped her on white cardstock and mounted it onto some blue paper.  Then I placed a wobbles behind the image to create motion.  Just add some palm fronds from Cheery Lynn and die cut poinsettia flowers from Prickley Pear with some Candi and it completes the card. Be sure to check out the Riley blog for more fantastic cards!

Monday, August 29, 2016

I love coffee!

This is one of my favorite sizzix dies.  It's the gift card Flip it Die. I like to decorate the front of the card and when you open it up...it flips over to show the gift card.  Wouldn't it be great to add a Starbuck's Gift Card with this adorable Riley image?  There are some many funny coffee sayings from the Funny Bones collection that would work with this as well!  Come in to The Stamp Shoppe and see our great Collection of Riley images!

Thursday, August 25, 2016

Gray Skies...

Today I am showcasing the Umbrella Clear set from Prickley Pear Rubber Stamps.  This set along with the matching dies are so much fun to work it...and the possibilites are endless!

 Once I cut out the umbrella from white cardstock, I used the negative over this decorative paper with the umbrella sections to create a fun look.  These adorable little ducks are included in the set.  These ducks would also be cute for a "Ducks in a Row" card.
Using the Umbrella sections, I popped them up over the cut out umbrella.  Then using the matching flower clusters, also included in the set, as added decoration to the card. Check out the PPRS blog today to see more lovely samples from the talented Design Team!  All the new Clear Stamps are in the store now!

Tuesday, August 9, 2016

Mushroom Lane

I love these charming Mushrooms...new to Riley and Company.  They are so fun to color with Copic Markers!  These stamps have so many adorable little details with each of the different structures.  Here I am using the Polkadot House and the Post Office

 I stamped extra flowers from this stamp to use as extra accents on the card.  I fould this purple paper in my stash of scraps that included Garden Words that fit perfectly with the Mushroom House.
With this Post Office, I used some brown Decorator paper to make a little dirt mound for the image to sit on.  Then I used some strips of paper for banners and punched 3/8" circles that I formed with my flower shaping tool to create "Candi" to match the background.  Finally, I used some small cut out letters to make the HELLO greeting.  These are so fun to color with Copics!  They are whimsical, allowing you to be creative with color choices.  Hope you are having a great week!

Friday, August 5, 2016

Have a very Smurfy Day!

It's Friday and the final day of the new release week!  Isn't this just a flash from the past?? Do you remember the smurfs?  When I saw this litte gnome, I thought...Papa Smurf!! So I made a little scene from Smurfville on this card using the new Gnome Homes clear stamp set from Prickley Pear Rubber Stamps.


Don't forget that Prickley Pear Rubber Stamps is offering free shipping on orders over $25.  Just type in FREESHIP into the coupon bar!  There are more card ideas on the PPRS blog...so check them out! We hope that you enjoyed this week and were inspired!  Be sure to like us on Facebook.  Also...we love to hear your feedback!

Monday, March 23, 2015

Spring is here and with Spring is the promise of new life and hope.  Today, I am using the Sleepy Time Baby stamp from Prickley Pear Rubber Stamps.  I cut out the image with an oval die and sponged the opening with Victorian Velvet Distress Ink.  Then I popped it over a doily that I cut out with the Cheery Lynn die.  I inked up the "Baby" part of the the Makes love stronger sentiment...also a stamp from Prickley Pear.  Then I cut out two of the flowers from the PPRS Poinsettia Leaves die along with corners to add embellishments to the card.  I then added two sequins and a Candi to the flower center to finish it off.  More great cards on the PPRS blog, so be sure to check them out!  Happy Spring!

Tuesday, February 17, 2015

Bird Bath

Here's another card using stamps from the new Spring Release from Prickley Pear Rubber Stamps.  I am using the Pond of Ducklings stamp that I colored with Copic Markers.  I used some fun bright paper from Bo Bunny as a background.  Then I stamped the Happy Spring sentiment onto a banner and added some Candi for a simple embellishment.  We hope you enjoyed the hop...I know that I sure did!  Check out today's cards too.  Enjoy!

Sunday, February 15, 2015

Blog Hop Day 3


Welcome to the third and final day of our blog hop.  If you are following our blog hop, you should have come from Rita's blog. Yesterday, you saw what Little Boys are made of and today you can see what Little Girls are made of!  Edith (HH0174) is colored with Copic Markers.  After I cut the paper down to the size I wanted, I used removable tape around the four sides.  Then I used Gathered Twigs Distress Ink to sponge around the image.  I found these decorater papers in my scrap bin and thought they were the perfect choice for this image.  The lacy border was cut out with a die from Cheery Lynn Designs.  The corner is also a Cheery Lynn die cut out of silver pearlescent paper.  Then I used the flower die from PPRS and the matching flower clear set.  The center of the flowers were made with a cream pearl pen.  Finally I used some cream dotted Candi to finish the card.

Now to continue on the hop, go to Michelle's blog! Contine to leave some comments...we've enjoyed hearing from you.  If  haven't seen the blog hop prizes, here it is:
Thanks for stopping by!

Monday, January 12, 2015

Babies make...

New Year's makes me think of new beginnings.  Today I am using the Welcome Stork from Prickley Pear Rubber stamps.  I colored the image with Copic Markers.  Then I cut it into a rectangular shape allowing the baby bundle to be cut out to add an extra dimension.  Then I used the removeable masking tape around the edges and sponged it with Spun Sugar Distress Ink.  The Baby sentiment was stamped onto decorator paper and made into a banner.  I cut out the flourish with the die from Pricley Pear.  Then I faux stitched the banner using the ScorBuddy and ScorBug.  Finally I added some Cando to finish the card.  The PPRS blog has lots of neat cards, so check them out!

Monday, January 5, 2015

Happy 2015!

It's hard to believe another year has gone by...how time flies.  Today I am using more of a winter stamp.  This cardinal flourish stamp is from Prickley Pear Rubber Stamp.  I used a cuttlebug embossing folder to make the embossed frame on decorator paper.  Then I sanded the design to make it pop.  Then I used the Poinsettia Leaf die and Leaf set die to make the embellishing folliage.  Finally I stamped the sentiment onto a white strip and popped it onto the card.  There are more gorgeous cards on the PPRS blog, so check them out!

Tuesday, December 23, 2014

Jingle Bells

Wishing you a warm winter Holiday!  Here is the Winter sled from Prickley Pear Rubber Stamps.  I colored it with Copic Markers in the soft Pastel colors.  Then I used the Removeable Tape technique to add the sponging around the image with Distress Ink.  I adhered it over some festive, holiday paper.  Then I stamped the small Winters Lovebirds onto white card stock and cut them out.  I popped them up over the Washi tape strip.  Then I finished the card with the sentiment from the Snowflake Inserts stamp set and some Candi.  Hope you have a check to see the incredible cards the the Design Team created for you to enjoy on the PPRS blog!  Happy Holidays!!

Monday, November 3, 2014

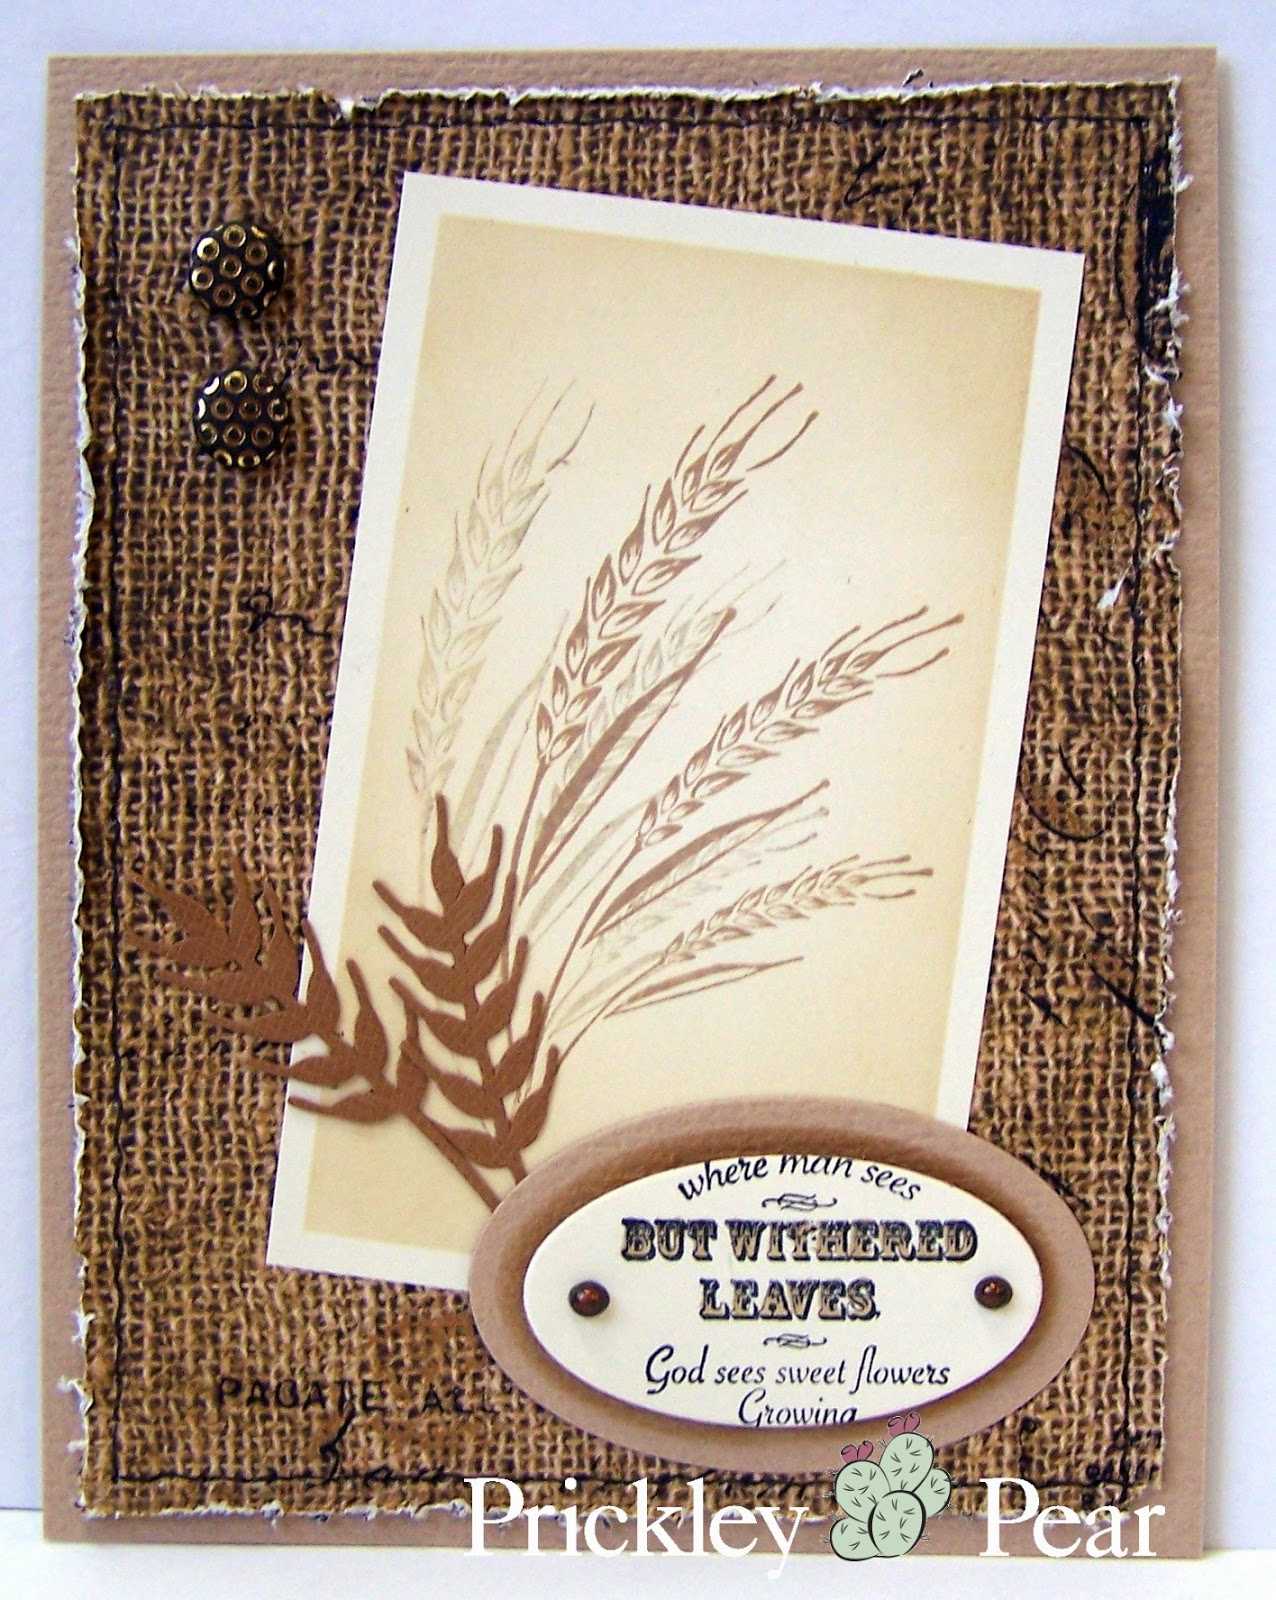
Withered Leaves

Today I am using the Wheat Stalks from Prickley Pear Rubber Stamps as my main image.  It is the season of falling leaves and harvest, so what a perfect way celebrate the season.  I stamped the wheat with Gathered Twigs distress ink.  Then I used my removable tape technique to frame the kernels of grain.  Then I used the wheat die from Cheery Lynn for another accent for the theme.  Finally I finished the card with the sentiment to remember that God sees things so much differently than we do and aren't we thankful for that.  See what other seeds of inspiration has been sown on the PPRS blog.  Hope you have a happy fall!

Monday, October 27, 2014

Happy Halloween!

This week I am using the Halloween Scribble Kitty for my main image.  This was a new fall release stamp from Prickley Pear Rubber Stamps.  I colored the image with Copic Markers, then trimmed down the white paper.  Next, I placed Removeable Scotch tape around the edges and the corners of the paper and sponged the paper with Gathered Twigs Distress ink.  Then I removed the tape and you now a framed image!  I added Candi to the corners for an added accent.  The background of the card uses Bo Bunny decorator paper, washi tape, and the Spiderweb Gate die. See more wonderful creations on the PPRS blog and I hope you have a Safe and Happy Halloween!

Monday, October 13, 2014

Fall Flower Display

It's that time of year with pumpkin patches, corn mazes, and colored leaves.  Today I am using the Daisies in Boot stamp from Prickley Pear as my main image.  I colored the flowers in fall colors and cut out the image with my Scan N Cut machine.  I cut out the Scallop Oval from Prickley Pear and while the die was still over the paper, I sponged the paper with Frayed Burlap.  Once the image was popped up onto the oval, I cut out a Flourish and separated it into two pieces.  Then I adhered the pieces behind the boot.  The background papers are from Bo Bunny.  The sentiment was form the Flourished Oval stamp set...and of course...I made a banner for my greeting!  Then popped on two Candi accents and my card was complete.  Meet the new design team on the PPRS blog today!

Tuesday, October 7, 2014

Wisconsin Fall

I think fall is here to stay in Wisconsin, so it's time to pull out those fall stamps.  Today I am using the Oak and Maple leaf clear stamp set from Prickley Pear Rubber stamps with the matching die.  I used lots of different elements on this card.  First I pulled out some decorator paper.  Then I used some decorator washi tape and ric rac washi tape. The doily and frames that I used behind my leaf were the Scalloped Circle die and Scallop Circle Nesting die...both from Prickley Pear Rubber Stamps.  I added the Thank you sentiment from the stamp set and made it into a banner.  It still needed a little bit more, so I added the green swirl that I cut out with the flourish die.  And of course...some candi!!  Be sure to head on over to the PPRS blog for more great cards from the Design Team!

Monday, September 29, 2014

Poinsettia Blossoms

This Poinsetta Blossoms stamp is one of the new Prickley Pear Holiday stamps.  I love the festiveness of these beautiful flowers.  The first poinsettia is cut out in a square, but with the petals hanging off the frame.  The second Poinsettia is cut out and popped up onto the card.  The sentiment is from the Victorian Ornaments 3 stamp set.  These clear sets have many small and perfect sentiment to add to the front of cards.  Check out more beautiful samples on the PPRS blog.

Monday, September 22, 2014

Dia de Muertos

Dia de Muertos means Day of the Dead.  This is a Mexican holiday to celebrate and to remember those that have departed.  This holiday is celebrated on November 1, which I know is still a few weeks away.  In honor of that holiday, here is a card that uses the new Cats 2 stamp set along with the Pumpkin die and stamp set.  The fall colors that I used on this card go with the autumn season more that is used for the holiday.  Most costumes during this event are very colorful and bright. Even though this isn't a holiday we celebrate, it is nice to often remember those that were special to us and have past on.  So wishing you a happy fall and bountiful harvest! Don't forget to check out the PPRS blog!

Wednesday, September 3, 2014

Naughty or Nice?

Hope you enjoyed seeing our creations for the last two days!  But we aren't finished yet...We are here for one more day of inspiration.  If you are following the hop you have come from Michelle's blog.  

Today, I am using the FF0177 Santa Checking His List stamp from the Prickley Pear Holiday Release.  I colored him with Copic Markers.  Then I used removable tape around the box and sponged the inside with Pumice Stone Distress ink to create a vintage look.  Then I removed the tape and matted onto a piece of red card stock.  Then I distressed the edges of the red paper.  I stamped the EE0197 Naughty or Nice sentiment onto white paper and cut it out with angles to create a whimsicle look.  I cut out different papers to make banners and I used the Scor Buddy to make the score lines, which I then sanded to make them stand out.  Finally, I cut out the Snowflake die and stamped the images in the center with the new CLR038 Snowflake Insert clear stamp set. Throw all the elements together and you have a Vintage, Christmas Collage!   The stamps and dies are now available to purchase in stores or online.


Day 3 Hop Stops
Prickley Pear
Brenda
Tracy
Maureen
Barb
Rene
Angie
Michelle
Heidi