Thursday, August 29, 2013
Dreamweaver Christmas Challenge
I am using the Joy stencil from Dreamweavers for this card. I first used the black matte paste to emboss the image onto white card stock. Then after that was dry, I applied the crackle paste over the black paste. Once the paste dried and cracked, I place the clean stencil once again onto the pasted Joy and sponged the letters with Distress Ink. The colors that I used were Barn Door, Gathered Twigs and Peeled Paint. The background paper was a cream color, but I wanted more of a green and red coloring. I sponged the paper with Peeled Paint and I had my color scheme that I was looking for. I tied a piece of red ribbon from May Arts and glued it over the ornament. Then I cut out the Pine Bough using a die from Prickley Pear Rubber Stamps. Check out more Holiday cards from the Design Team...
Wednesday, August 28, 2013
Christmas Card Collection
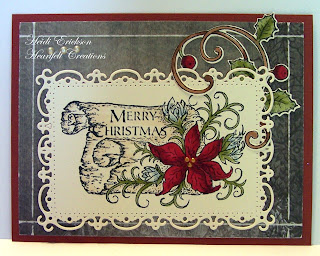
Today I am using the stamps from the Peaceful Night Stamp Set. I also added holly embellishments that I made using the Holly Berry set along with the matching Holly Berry Dies. The images were colored with the Copic Markers. The papers that I used are from the Christmas Card Paper Collection. Check out more beautiful samples on the HC blog today!
Wednesday, August 21, 2013
Bright Christmas Set
Saturday, August 17, 2013
Dreamweaver/Woodware UK Saturday Hop
Welcome back to the annual Dreamweaver and Woodware Christmas in August Extravaganza week! Today we will be again knocking your Christmas Stockings off with fun and inspirational ideas for the upcoming holidays. All that you need to do is hop back and forth across "the pond" today, continuing to ooh and aaahh as you go...leaving us plenty of holiday love. In return, you will be entered to randomly win one prize package for a UK commenter and a second prize package for a US commenter, featuring products distributed in the UK by Woodwar...including Dreamweavers and Stampendous!
Prizes include four stencils, one die and two stamps. (Selections my vary)
Here's what I've created for you today:
Here's a little house mouse for you from Stampendous. I colored him with Copic Markers, then cut out around the top of it. On the background, I used the Holiday Flourish stencil from Dreamweavers. I dry embossed it through my Cuttlebug machine and while leaving the stencil over the paper, sponged with the Pine Needles Distress Ink. I then added some of the Copper Pearls to the berries. I let them dry. Then I popped up the candy can totting mouse up to give it some dimension, added some Crystal Art Institute glitter on the snow and some white Fun Flock on the fluffy, furry borders of his coat. I embossed the Season's Greetings with the Black Matte Paste and cut it into a tag. Then mat it with red paper and pop it up onto the card. I hope you enjoyed this week, seeing all the fun Christmas creations. But you aren't done yet, there are still a few more to see!!!
Dream It Up!
Woodware UK
Cherylynn Moser
Jessica Griffin
Jane Gill
Laura Drahozal
Terrece Siddoway
Dorothy Adam
Heidi Erickson (your here)
Louise Healy
Lyn Bernatovich
Lea Kimmel
Stacey Rumsby
Deb Frost
Wendy Jordan
Pam Hornschu
Cyndi Bundy
Woodware UK
Cherylynn Moser
Jessica Griffin
Jane Gill
Laura Drahozal
Terrece Siddoway
Dorothy Adam
Heidi Erickson (your here)
Louise Healy
Lyn Bernatovich
Lea Kimmel
Stacey Rumsby
Deb Frost
Wendy Jordan
Pam Hornschu
Cyndi Bundy
Wednesday, August 14, 2013
Christmas Card Collection
We are pleased to present the Christmas Card Collection. The Chrismas Card Paper Pad has 76 card fronts that will enable you to create quick and easy Christmas Cards that are embellished or simple-your pick! This paper pack is a fantastic solution for getting the most beautiful cards in the shortest amount of time. If you don't need one side, flip it over and use the other side! The coloring is done for you. There are many panels for utmost variety and the best selection. The stamps and dies released with this collection are absolutely festive and ornamental. The gorgeous type and frames will help you create the most beautiful Christmas projects that your friends have ever seen.
Leave a comment on the Heartfelt Creations blog by August 20th to be eligible to win the entire collection!
Both of the cards that I made today are using the Christmas Song Stamp Set. I colored the images with Copic Markers and framed them with the beautiful new papers from the Christmas Card Collection Paper Pack. I used the new Holly Berry stamp set with the matching die to add accents on both of these cards as well. This Holly Berry stamp set is a "must have" for your holiday greeting cards! They add just the right accent and a perfect finishing touch to your card. Be sure to hop on over to the HC blog for more ideas from this beautiful Christmas Card Collection.
Tuesday, August 13, 2013
Dreamweaver/Woodware UK Day 2
Welcome to the annual Dreamweaver and Woodware Christmas in August Extravaganza week! Monday through Saturday we will be knocking your Christmas Stockings off with fun and inspirational ideas for the upcoming holidays. All that you need to do is hop back and forth across "the pond" each day oohing and aaahhhing as you go, and leaving us plenty of holiday love. In return, you will be entered to randomly win one prize package for a UK commenter and a second prize package for a US commenter, featuring products distributed in the UK by Woodware...including Dreamweavers and Stampendous!
Prizes include four stencils, one die and two stamps, selection may vary.
Here's what I've created:
I made the background of the card using the Color Solutions Inks, Sizzling Silver, Winter Red, Noble Fir and Pine Bough mixed with the Alcohol Ink Thinner on the felt applicator. I tapped it all around the glossy paper until it was well blended and looked to be "marbled". I then used the Rubber mat to emboss the Holly Flourish over the marbled background. Then I used a light weight sanding block to sand off the color over the embossing. Then I used the Gold stencil paste over the Joy stencils and sprinkle Old Gold Art Institute glitter over the paste while it was still wet. Then I let it dry and matted it on red before I popped it onto the card. Then I wanted to use some Candi but I didn't have the right color...so I used the Color Solutions Winter Red to color a cream Candi and now it matches perfectly!Now's the time for you to leave a comment and move on to the next designer for today.
Monday, August 12, 2013
Giraffe on Vellum
I have to give credit to Barbara Marschall for this card today. These were all her techniques and I loved them so much I did one very similar to her original creation. I am using the Giraffe which was stamped on Vellum with Marvy Matchable Ink. Then I flipped the vellum over and used a large stylus with a thick mat and rubbed it over the open areas of the image. This causes the image to pop as well as whiten the vellum. For the background, I used masking tape which I tore into pieces and layered them in a hodge podge. Then I rubbed black ink over the tape and rubbed in with a kleenex. Then I used some Gathered Twigs Distress ink over that and rubbed it in again. I adhered the vellum down with glue dots, then added the brown pearls with a Viva Decor Pearl Pen over the dots and let them dry. I add some of the olive leaves that were cut out using a Cheery Lynn die.
Labels:
Cheery Lynn Designs,
distress inks,
prickley pear,
Viva Decor
Thursday, August 8, 2013
Prickley Pear Design Team Call
It's that time again! Prickley Pear Rubber Stamps is seeking New Design Team Members!
Now is the time that all Prickley Pear lovers have been waiting for - It's you opportunity to become one of our fabulous Design Team Members. We are known for our beautiful red rubber designs and clear stamps with matching dies. It does not get much better than this. We were one of the first to bring you the concept of matching dies and stamps. Here's your chance to WOW us with your most creative projects.
DT's Swag and Perks:
- A big initial welcome package full of Prickley Pear products and other goodies!
- Generous amount of product when we send out new releases
- Near wholesale pricing (40% off all Prickley Pear products) twice within your 6 month term.
- Occasional product swaps with other vendors
- Weekly feature of design team work on blog
- Compensation for projects published in print magazines where Prickley Pear is the focus. The company name must be mentioned in the article/supply list.
- Bio and photo listed on website
- Membership into private design team yahoo group where we have fun and share.
Expectations of our Designers
- Weekly posting of a new project with linked supply list and short write up. This is to be on the DT blog and also personal blog.
- Participate in all releases
- Post & promote weekly to Facebook, Pinterest, Splitcoast, Two Peas and other favorite forums.
- Be able to take clear and detailed photographs of all work.
- Be creative, have fun and enjoy our team. No stamps from other companies allowed.
Eligibility Rules
- Submit three projects featuring beautiful stamping techniques, good use of color and layout by August 25th. Please provide a link to your blog, and a small paragraph on why you think you would be a good fit for PPRS. Submit all to nmk28@yahoo.com
Here is a sample of Prickley Pear Stamps. I used some of the red rubber stamps as well as a clear set with the matching dies. Have a wonderful day!
Labels:
candi,
Cheery Lynn Designs,
distress inks,
prickley pear
Wednesday, August 7, 2013
Sun Kissed Frame
Today I am using some of the Sun Kissed Fleurs from Heartfelt Creations along with the Classic Leaves that are part of the Burst of Splendor Collection. With these Sun Kissed flowers they cut out all the different flowers at one time. This is especially nice to have several flowers ready to use on future projects. For this card, I used the largest size flowers. I then colored them with Copic Markers to match the decorator paper that is in the Sun Kissed Fleur Paper Collection pack. I had the Opulent oval, from Spellbinders, already cut and in my "to be used someday" stash. I decided that it would be perfect for this card. Check out more beautiful projects on the HC blog today!
Labels:
Copic Markers,
heartfelt creations,
Scor-Pal,
Spellbinders,
Viva Decor
Monday, August 5, 2013
Adorable Birds
These little birds from Prickley Pear Rubber stamps are adorable and fun to use on your cards. You will be seeing more of these little guys on my cards in the future! I started out with the Spring Flourished Oval Clear stamp and I cut it out with the matching Flourished oval die. Then I cut out some of the mini hibiscus flowers and stamped the with one of the mini hibiscus flowers in the stamp set. I adhered them over the small flowers on the flourished oval. Then I cut out the birds and stamped the humming bird and wing on the die cut piece. I popped up the wing to give it some dimension. Then I added the bird onto the card. I finished it out with the sentiment from the Heart Key Crown Clear set. Hop on over to the PPRS blog for more card ideas!
Friday, August 2, 2013
Dreamweaver/Stampendous Grand Finale
Today is the Final Day and the Grand Finale of the Collaboration with Stampendous Rubber Stamps and Dreamweaver Stencils! All the Design Team members form both groups will be featuring a slew of amazing projects and of course...prizes!!
One prize will be given away for comments left today!! Winners will be selected randomly and announced Thursday, August 8th (Note: USA addresses only because of the high international shipping costs) Here is what you could win:
Here is what I created:
I used the Queen Bee Perfectly Clear stamp set from Stampendous. I cut out the image with the large scallop Circle Die from Spellbinders. While the die was still on the paper, I sponged the inside with Frayed Burlap Distress Ink. Then I used the Dreamweaver Thank You Stencil and embossed it with the Black Matte Embossing Paste. I stamped and colored the bee. Then I cut out the bee and popped it up onto the card. All stamped images are colored with Copic Markers.
Now hop on over to the next in line. Don't forget to leave a comment for your chance to will a prize!!
Subscribe to:
Posts (Atom)


