 Today I used a little Magnolia girl sitting with flakes. I colored her with Copic Markers, cut her out and popped her up on a bench from Whiff of Joy. The images were layered on some of the new Bo Bunny winter paper. Snowflakes were punched with a Martha Stewart punch. I added the sentiment from Amuse on a oval scallop piece of paper. Then I added pearls to the snowflakes and sentiment using the Viva pearl pen. This works well for those cold January birthdays!!
Tuesday, December 28, 2010
Happy Brrrthday!
Today I used a little Magnolia girl sitting with flakes. I colored her with Copic Markers, cut her out and popped her up on a bench from Whiff of Joy. The images were layered on some of the new Bo Bunny winter paper. Snowflakes were punched with a Martha Stewart punch. I added the sentiment from Amuse on a oval scallop piece of paper. Then I added pearls to the snowflakes and sentiment using the Viva pearl pen. This works well for those cold January birthdays!!Monday, December 27, 2010
Heartfelt Winter Wishes

 These Elegant Snowflake Medallions from Heartfelt Creations fit their Ornament die cuts. Just stamp and cut out six flakes with the matching nestabilities die, assemble and add a little embellishments and you have a beautiful snowflake. For the first card, I used the sentiment from Prickley Pear and cut out two ovals with the nestabilities. Then attached the smaller snowflake for an added accent on the card. Adding some silver ribbon, I tied it all together. For the background on the second card, I used some score tape with Microfine highlight glitter to add some extra sparkle. I layered the snowflakes on Bo Bunny's new winter papers. Both cards have some embossing to add some texture. These are quick and beautiful cards.
Saturday, December 25, 2010
Midnight Madness challenge #82
 Here's one of my cards for the Midnight Madness Challenge for this month. I used paper from the new Bo Bunny Midnight Frost collection. Then I used the snowflake border die from Tim Holtz and tied a ribbon around it with the sentiment tag. The sentiment is from Amuse. I stamped the bear from High Hopes and colored him with Copics. Then I popped him up on the Labels 11 Nestabilites dies, which I had sponged with Summer Sky Momento ink before removing the die. I used the snowflakes to create the circle doily piece behind my image. Stay warm!
Friday, December 24, 2010
Mojo Monday #170
 I am finally doing another challenge!! Here is for this week's Mojo Monday sketch challenge. I used my little Ricky Raccoon from Stamp Shoppe Creations and added a heart tattoo for a Valentine's card. I colored him with Copics and added some white highlights with a white get pen. He is layered on some of the new Bo Bunny Valentine paper...The Crush collection. Instead of a circle, I used the heart nestabilities to follow the love theme. Hope you all have a happy Christmas tomorrow!!
Friday, December 10, 2010
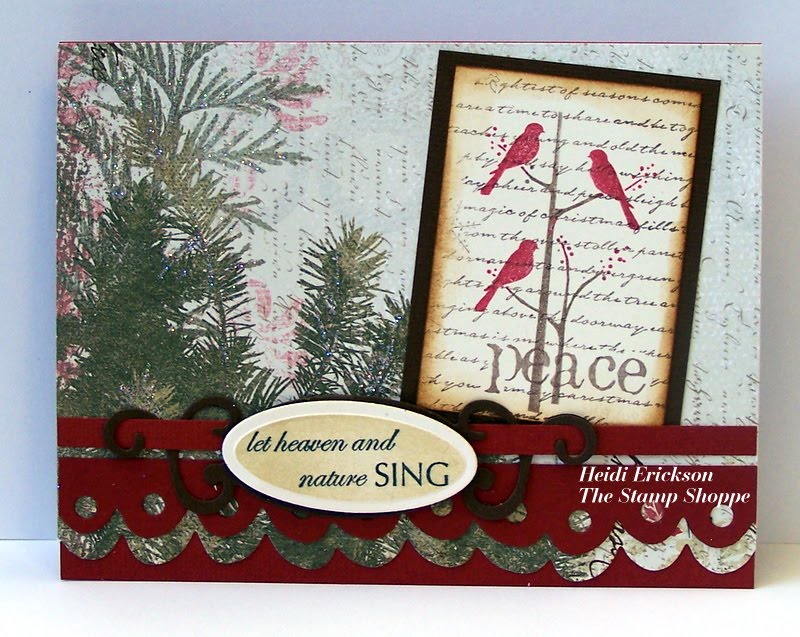
Season's Tweetings
 These two birds are from Whiff of Joy. I stamped them and colored them with Copic Markers. Using the oval nestabilites, I cut out the bird all except the pine boughs. I then layered the birds onto the beaded oval frame, which I sponged the openings of the stenceil before removing the nestabilities from the paper. The paper was cut from My Mind's Eye decorator paper and faux stitched with the ScorBuddy and the ScorBug. After assembling my card and add the flowers, I used the Viva Pearl Pen to add the pearl accents and the snow on the branches. Stay warm!!
Friday, December 3, 2010
Merry Christmas

Here is a Snowman that I've had in my drawer for a few years and decided to get him out and use him again. This stamp is from Whippersnapper. I first choose the Christmas paper from the My Mind's Eye "Believe" collection. Then I picked out the cardstock to match. I then colored him with Copics to match the paper. I used the drippy goo Martha Stewart punch for the one border and the scallop edge border punch from Fiskars for the other. I used the Scorbuddy and Scorbug to make stitch lines around the card and on the red strip. I then used dies to make the swirl and the poinsettia accents and decorated around the Merry Christmas sentiment. The sentiment was cut out using Spellbinders circle dies. Keep warm!
Thursday, December 2, 2010
Thanks a BUNCH!
 Here's a cute stamp from Stampavie. I colored her with Copics and added some white highlights. The papers are from My Mind's Eye and Pink Paisley. I stamped a leafy background from Impression Obsession with Vintage Photo ink on the Kraft paper to add some texture. Then I stamped the sentiment from Amuse onto a tag and tucked it under the ribbon to make it look like I tied it into the ribbon. Most of the time I used the "Thanks a BUNCH" sentiment with flowers, but it worked great for the bushel of apples too!
Tuesday, November 30, 2010
A Blooming Card!

Here's a blooming card that we will be doing in the Blooming Card class at The Stamp Shoppe in Wisconsin on Tuesday morning, December 14th. This is using the McGill blooming punches to make the garden rose. I added some cuttlebug embossing, nestabilities and some other die cuts to finish off the card. If you are interested in the class, all you have to do is email or call us and we will sign you up!
Monday, November 29, 2010
Peeking out to say...

...Happy Day! Here I used the Tina Wenke stamp from Stampavie. I colored it with Copic Markers. Then I layered it onto a punched doily. The doily was punched with a new Martha Stewart around the corner punch. It is hard to see from the picture, but I used the ScorBuddy to add some score lines in the doily. Then I used the ScorBug to add the "stitches" around the decorator paper. I used My Mind's Eye paper and Creative Imaginations ribbon.
Tuesday, November 23, 2010
Holidays are a Real Tweet!
 Here I used the Robins from Stampavie. I colored them with Copic Markers. I was trying to decide what colors to use on the birds, but decided to do non-traditional colors. With the Memory Box bird paper as the background, I wanted to color them to match the paper. I then embossed the bird paper, sanded it, and then sponged some Vintage Photo Distress Ink over it. Using two Martha Stewert punches, I layered them and distressed the Holiday lace layer with Vintage Photo Distress Ink as well. Finally, I popped the birds up on a lacey die cut out to frame the birds. Keep warm and cozy!!
Tuesday, November 16, 2010
Except Just One Moose!

This stamp is NEW from Stamp Shoppe Creations. Here is Malkin the Chris"moose". Check out other Malkin stamps from our Stamp Shoppe Creations store blog. I stamped the Chris"moose" and colored him with Copic Markers. Then I layered him onto blue cardstock that was cut out with the new nestabilities oval eyelet die. I added pearls with the Viva Pearl Pen. The border punch is from Martha Stewart. Papers are from Daisy D's. The sentiment is also from Stamp Shoppe Creations.
Thursday, November 11, 2010
Christmas with MME

 Here is the stamp set from My Mind's Eye that matches their "I Believe" Christmas paper. All the stamps you see are included in the one stamp set. All images are stamped with Memento Ink and Colored with Copic Markers. Add some ribbon, embellisments or decorative borders and the cards are complete!
Wednesday, November 10, 2010
Spring ribbons

Here is another Creatables from Ecstasy Crafts. This is the ribbon slides. Just cut out with your cuttlebug or Big Shot and emboss it. Then run a ribbon though the slots. Now you have a neat embellishment to add to the card front. The image was from Stampavie and colored with Copic Markers. I cut out the image with a nestabilities die and without removing the die, I sponged some pink around the edges. This leaves a white border. The swirl is from the Creatables die set that I used in a the previous post...A little note Bear.
Tuesday, November 9, 2010
It's Cake Time!

This little cake girl is a new stamp from Ecstasy Craft. I colored her with Copic Markers and cut it out with an oval nestabilities die. I them layered it onto a Stampin'Up die. All papers are from My Mind's Eye. Just a little sparkle ribbon and a flower and it's ready to send!
Monday, November 8, 2010
A little note Bear

This little bear is from Stampavie. He was colored with Copic Markers and cut out with an oval nestabilities die. The Oval scallop doily, flower and swirl were cut out with the Creatables from Ecstasy Crafts. Then I popped them out on a pink embossed background paper and...A finished card. Check out other Creatable dies coming soon!
Saturday, October 30, 2010
Punched Lily
 This Lily was punched by the *NEW* McGill Paper Blossom Punches. Just punch, color, pinch, bend, cup and assemble to create a beautiful 3-D flower. The pearls are created with the new Viva LePens. Squeeze a pearl shape onto your card and create a brilliant half pearl. This card uses the swirl die and embossing folder from Tim Holtz. On Saturday, Nov. 6th, we will be having make and takes at the Stamp Shoppe in Schofield, WI and this is one of the cards we will be doing. Stop in and try out these new products.
Thursday, October 21, 2010
Sweet Treats!
 This card is taking an idea that was shown in our Stamp Club. This is a tri-fold card with a twist. I used a Halloween theme. The papers are from Making Memories. The Scary Fence and Spider web punches are Martha Stewart. Franke is a Whippersnapper stamp. The Sentiment is from Northwoods and Bats are stamps from Amuse. The cut out is a die-namics die from My Favorite Things. The Spider gem is from Memory Box. The fence and papers were distressed with Vintage Photo Distress Ink. Below is a look at the inside:
 Happy Stamping!!
Friday, October 8, 2010
Grunge with Elegance

I wanted to play with some of the Tim Holtz products that we had in our store. I had fun playing with all the Texture Fades and On the Edge Dies. I got some of my inspiration from Wendy Vecchi. She is on the Tim Holtz Design Team and Creates her own line of stamps called Studio 490. Be sure to check out her blog for very cool ideas!! This first card I used the Faded Denim, the Peeled Paint and the Victorian Velvet distress inks to enhance the papers and add a little grunge. I used the Damask and Cracked embossing folders on the background and flowers. The saying is from Stamper's Anonymous and cut out with one of the new Nestabilities labels. Of course I distressed the edges of the label with Vintage Photo Distress Ink. The fence is one of Tim Holtz's new On the Edges Dies. The flowers...which you will see me use a lot, is the Tattered florals die. The butterfly punch is a silhouette punch from McGill. I added some white pearls to the butterfly for some interest.
 This second card uses the Tattered Florals die again. I like to add texture to the flowers with the Texture fade plates. Here I used the Swirls and Dot Matrix embossing folders for the flowers and then cut out an Oak leaf from the Tattered Leaves die and embossed it with the Gridlock folder. I again sponged some of the Distress ink onto the embossed elements. For the the green border pieces, I used the Ornate and Scallops On the Edge dies. I then made two parallel score lines with my ScorBuddy on the Scallop paper. I stamped some flourishes with Memory Box stamps. Then I used the blue Liquid pearls to add some accents to the card. The "note of Thanks" sentiment is from Printworks and stamped on the Lacey Circle Nestiablities. The Cardstock is a textured paper from Bazzill. When the edges of the card is inked with Vintage Photo ink, the texture becomes more apparent. If you like these cards, call or email to register for our Make-and-Take Saturday at the store Oct. 16th. We will be featuring the Tim Holtz Texture Fades and On the Edge Dies.
 Tuesday, September 28, 2010
A bench for All Seasons
 Winter: I stamped the bench from Whiff of Joy and colored it with Copic Markers. Then I added "snow" with the Snow Marker from Marvy. Add glitter while wet, then heat from the back side to dry and cause the snow to puff up. I used new Christmas paper from My Mind's Eye. The Layout was inspired from a Mojo Monday Sketch. The cardinal was cut out from the decorator paper.
 Spring: Here I stamped the bench and colored it with Copics again. Then I used the Art Impressions grass to stamp around the bench. Then stamped the flowers on white cardstock. Masking the flowers, I then stamped the pot from Art Impressions to make it look like the flowers are in the pot. After coloring the flowers, I cut it out and popped it up. The Sentiment was stamped on white cardstock and then cut with a nestabilities die. Leaving the nesties on the paper, I sponged some pink Distress Ink over the center. After I removed the nesties, I stamped the sentiment on the oval.
Wednesday, September 8, 2010
A little birdie told me...
Christmas is coming! It is hard to believe that it is already September and Christmas will be here before we know it. With the cool and windy weather we had today, I actually had some christmas inspiration and got a few Christmas cards done. I stamped this Sugar Nellie stamp and colored her with Copic markers. I used a new nestabilities label die for the blue matting. This is a square and I wanted to use it for a rectangle shape, so I used it as a mat on the top of my image and then used an emboss strip of paper to cover the bottom. I used the poinsettia folder to emboss the green strip of paper. The red dot flurry paper is from Cloud 9. Then I punched out a Martha Stewart snowflake and used a white glitter dot in the center of the snowflake to add a little glitz. Keep warm!
 I stamped this Sugar Nellie stamp and colored her with Copic markers. I used a new nestabilities label die for the blue matting. This is a square and I wanted to use it for a rectangle shape, so I used it as a mat on the top of my image and then used an emboss strip of paper to cover the bottom. I used the poinsettia folder to emboss the green strip of paper. The red dot flurry paper is from Cloud 9. Then I punched out a Martha Stewart snowflake and used a white glitter dot in the center of the snowflake to add a little glitz. Keep warm!
 Saturday, September 4, 2010
Heartfelt Creations
Whew! The kids are back in school and summer vacation is over...now I may get back on schedule. Let's keep our fingers crossed. I want to show you what is new and HOT at The Stamp Shoppe! We just got in our Heartfelt Creations stamps that match some of the nestabilities and their own sets of dies. In this card below. I stamped the cardinal and colored it blue...now he's a blue jay! I cut out the "blue jay" with the matching die. I then stamped the flowered branch on white cardstock and colored it with Copic markers. It is hard to see on the picture, but two of the flowers are cut out with the flower die to 3-D some of the flowers. Next I popped the bird onto the branch. The decorative edge on the card is done with the Tim Holtz On the Edge die. How easy is that!! Next, I used another cardinal stamp from the stamp set and this time I colored him red. Now he's a cardinal! I stamped the pine branch from another stamp set onto cream cardstock and colored it with Copics. I then cut out the cardinal with the cardinal die set and popped him onto the branch. The sentiment, from the pine branch stamp set, was stamped onto the Cuttlebug Cut and Emboss Labels and sponged with Vintage Photo Distress Ink. The card was embossed with the holly cuttlebug folder. It is a 5 X 7 folder so it will cover the entire back of a A2 size card.
 Here is one more sample of the holly leaves using the matching stamp and die sets. After the holly was stamped, I used an X-acto knife to cut around the holly leaves. Then I used the oval nestabilities to cut the opening. I used a spring green paper to mat and to show through the window. I then used my stamp-a-majig to line up the sentiment into the window. The sentiments that I used were from Printworks.
 For those of you that are interested and are in the Wausau, WI area on Saturday, Sept. 11, we are doing a make and take saturday that will feature these Heartfelt Creations stamps and dies. Come in a make 1 to 4 cards anytime between the hours of 10:30 am - 2:00 pm. If you have any questions...please email us! Have a fabulous Labor Day Weekend!
 Next, I used another cardinal stamp from the stamp set and this time I colored him red. Now he's a cardinal! I stamped the pine branch from another stamp set onto cream cardstock and colored it with Copics. I then cut out the cardinal with the cardinal die set and popped him onto the branch. The sentiment, from the pine branch stamp set, was stamped onto the Cuttlebug Cut and Emboss Labels and sponged with Vintage Photo Distress Ink. The card was embossed with the holly cuttlebug folder. It is a 5 X 7 folder so it will cover the entire back of a A2 size card.
 Here is one more sample of the holly leaves using the matching stamp and die sets. After the holly was stamped, I used an X-acto knife to cut around the holly leaves. Then I used the oval nestabilities to cut the opening. I used a spring green paper to mat and to show through the window. I then used my stamp-a-majig to line up the sentiment into the window. The sentiments that I used were from Printworks.
 For those of you that are interested and are in the Wausau, WI area on Saturday, Sept. 11, we are doing a make and take saturday that will feature these Heartfelt Creations stamps and dies. Come in a make 1 to 4 cards anytime between the hours of 10:30 am - 2:00 pm. If you have any questions...please email us! Have a fabulous Labor Day Weekend!
Saturday, August 14, 2010
Microfine Glitter - WOW!
I am having fun with the new Microfine Glitter from Elizabeth Craft. Using the Be Creative tape on the background. Once the liner tape is removed, you can use the liner to cut or punch shapes to mask images. On the sample below, I punched out snowflakes and put the masks back on the tape. Because the liner is the mask, they can easily be removed. Then you sprinkle on the Liberty Blue Microfine glitter onto the exposed tape. Rub glitter firmly into the tape and shake off the excess. Now remove the snowflake masks...It works best with a fine pointed tweezers. Then sprinkle with the Cool transparent glitter and again rub glitter firmly and shake off the excess. This technique is called brushed velvet. It is smooth and the glitter won't rub off onto you hands later!!! On the butterfly card, I used a square of the Be Creative tape on white cardstock. Then after I removed the liner sheet, I place a Class A'peel butterfly sticker onto the tape. Use the removed liner to press the sticker onto the tape. Then I used the transparent glitter on the tape and rubbed the glitter firmly into the exposed tape. Now the whole square is covered with glitter. Then you can use your Tombow markers directly onto the glittered surface and spread the color with a water brush. I love this look!

This is just one more sample that I did using the NEW spider web border punch as a mask. Then using the Java and the Grasshopper Microfine glitters to fill in the tape sheet. There will be a class offered at The Stamp Shoppe on September 7th for anyone that would be interested in seeing more with these techniques.
 On the butterfly card, I used a square of the Be Creative tape on white cardstock. Then after I removed the liner sheet, I place a Class A'peel butterfly sticker onto the tape. Use the removed liner to press the sticker onto the tape. Then I used the transparent glitter on the tape and rubbed the glitter firmly into the exposed tape. Now the whole square is covered with glitter. Then you can use your Tombow markers directly onto the glittered surface and spread the color with a water brush. I love this look!
This is just one more sample that I did using the NEW spider web border punch as a mask. Then using the Java and the Grasshopper Microfine glitters to fill in the tape sheet. There will be a class offered at The Stamp Shoppe on September 7th for anyone that would be interested in seeing more with these techniques.

Wednesday, August 11, 2010
Something Scary...& NEW!
 Check out these NEW Halloween Punches that just arrived at The Stamp Shoppe!! The spider web was punched out with the border punch. Then I used the ScorBug and a black, fine line pen to add the stitched string for the spider to hang from. The Spider is a new gem from Memory Box. The I used the Happy Halloween sentiment from the SRM Halloween sticker sheets.
 On this card I stenciled cloud with black ink on gray paper. Then I punched out the moon from orange paper and sponged the edges with black ink. I used the Flying Witch from Great Impressions and stamped her on white cardstock, colored her with Copic Markers and cut her out. The I used the Iron Fence border punch and punched it out of black paper. I punched the grass out of green cardstock. Then sentiment was from SRM stickers.
Monday, August 2, 2010
New from Cuttlebug!
Here are some samples of the *NEW* Cuttlebug Cut & Emboss folders: On the above card I used Cut & Emboss folder on pink Bazzill Basics cardstock. This folder cuts out the square window as well as embosses and pierces the paper. I then cut out out of the blue card, a square with the plain square nestabilities. I used some blue Creative Impressions silk ribbon to decorate the card front and adhered to the card. This cute little girl stamp is a clear set from Ecstasy Crafts. She was stamped on a white piece of cardstock and then I colored her with Copic Markers. This was placed inside the card, so you could see her through the front of the card. The sentiment is from My Favorite Things and cut out with a scallop nestabilities die.
 This sample uses one of the smaller Cut & Emboss folders for Cuttlebug. I used the oval die on a light olive green cardstock. Then stamped the daisies from JustRite stamps on white cardstock and cut out from the long oval nestabilities. The daisies were also colored with Copics. Then I just layered onto more paper and the card was complete. The folders make it look like you spent hours on the cards, when all it takes is a few minutes! Come in and see our whole collection!
 On the above card I used Cut & Emboss folder on pink Bazzill Basics cardstock. This folder cuts out the square window as well as embosses and pierces the paper. I then cut out out of the blue card, a square with the plain square nestabilities. I used some blue Creative Impressions silk ribbon to decorate the card front and adhered to the card. This cute little girl stamp is a clear set from Ecstasy Crafts. She was stamped on a white piece of cardstock and then I colored her with Copic Markers. This was placed inside the card, so you could see her through the front of the card. The sentiment is from My Favorite Things and cut out with a scallop nestabilities die.
 This sample uses one of the smaller Cut & Emboss folders for Cuttlebug. I used the oval die on a light olive green cardstock. Then stamped the daisies from JustRite stamps on white cardstock and cut out from the long oval nestabilities. The daisies were also colored with Copics. Then I just layered onto more paper and the card was complete. The folders make it look like you spent hours on the cards, when all it takes is a few minutes! Come in and see our whole collection!
Tuesday, July 13, 2010
Having flies...
 Here is the Mojo Monday challenge sketch for this week. First, I stamped the lily pad and then masked it before stamping the cattails. I then colored them with Copic markers and cut into four even squares. The waving frog was also colored with Copics and cut out to be 3-D over the background. All stamps are from the newest Stamp Shoppe Creations line. I used the rays Tim Holtz texture fades folder on the Bo bunny dots paper. Then I stamped sentiment from Endless Creations and cut out with the nestabilites. Finally I stamped the dragonfly, which was colored with Copics and glittered over the whole thing. I glued the bug over the sentiment and used the splashes instead of ribbon or paper, to follow all pieces of the sketch. Have a great week!!
Monday, July 12, 2010
Chalk It Up

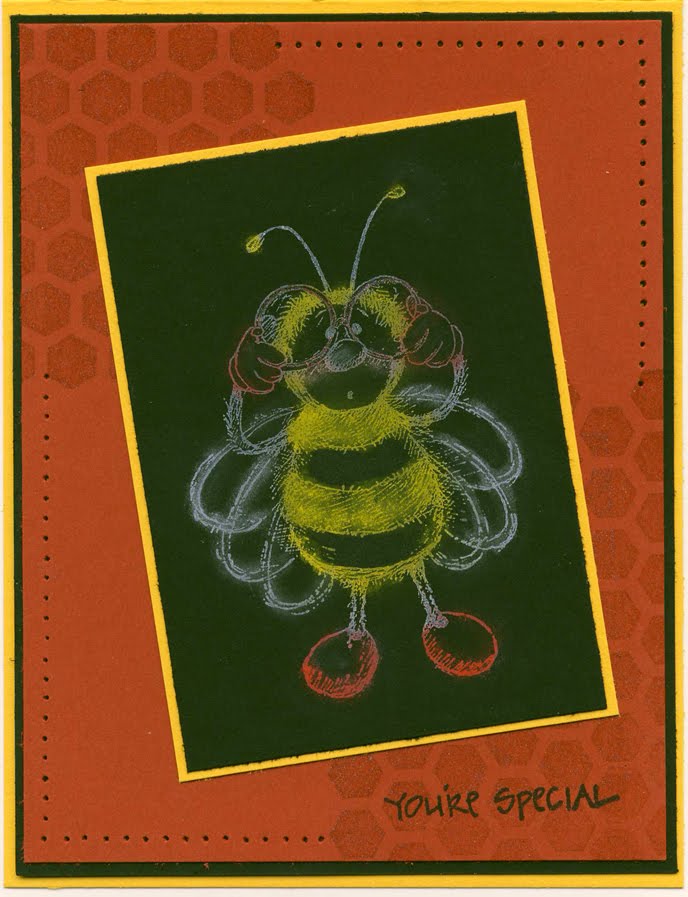
 Greetings Friends! After a bit of a hiatus, I'll be back at it this week teaching at the Shoppe!
Won't you join me for a class featuring Chalks? You know, those great little coloring tools that are stuffed waaaayyy back in your drawer?
I'll be featuring the following techniques: Background Burst, Chalkboard and Pulled Pastels.
Class starts at 6pm, Thursday, July 15th! See you then!
Sunday, July 11, 2010
Here's the scoop!
 Yesterday, I had my cream paper all embossed with the Tim Holtz Notebook embossing folder, distressed with Old paper Distress ink and punched with the EK Success binding edge punch. Then it sat there on the table and I didn't know what to do with it. Today when I saw the Sketch Saturday challenge sketch...I had an idea. I stamped the bear with ice cream from Whippersnapper and colored him with Copics. I then cut him out with the label from Nestabilities. Using the new Victorian Velvet distress ink, I sponged it over the labels die. I used the notebook paper I created yesterday as the matting fot the image. The sentiment was cut out of the fancy labels die and sponged over with the Vintage Photo ink. It all seemed to fall into place this morning. So...if there are pieces laying around that you want to use, but aren't sure what to do with them. Sleep on it and maybe tomorrow you have just the idea that you wanted! Have a good day!!
Saturday, July 10, 2010
It's fishing time...Dude!
 I made this card to satisfy two challenges today. The Cute Card Thursday challenge for this week was the theme "Schoold out for the summer!" and then I used the sketch from Friday Sketchers. I wanted to use one of my Stamp Shoppe Creations stamps, so I settled on the Dude. Now the next question was how to make him look like school is out?? I found my Northwoods cube that had a fishing pole and fish on it. The only problem was that the pole wasn't long enough, so I added an extra link to the pole and drew in the bobber and hook. Then I took the fish and stamped them two times. I got all the elements in the right spot by using my Stamp-a-majig. I then colored this guy with Copic Markers. I stamped the Endless Creations "Take it easy..." stamp and cut out with the large scallop oval nestabities. I wanted to use something different for the strips, so I used some red twill ribbon and then a strip of blue cardstock that I put through the Tim Holtz's Dot Matrix Texture fade folder. I will have to see what other accessories this dude should have!!
Friday, July 9, 2010
On the Edge...

 I haven't used my Tim Holtz On the Edge dies very much. In fact they have been sitting on my shelf too long, so I decided to get them out, dust them off and make some cards. I used some of the brand new Memory Box stamps and what fun I had. The top card uses the Plaque & Postage die. Using a piece of Chocolate Box Core'dinations paper, I scored the card at 2 1/8" and 4 1/4" on my ScorBuddy. I folded back the the flap and used the Plaque side of the die on that edge. I used another piece of the core'dinations paper to emboss the holly background and then sanded it to have some of the red show through. I stamped the scripted holly bird from Memory Box and then distressed the edges with Vintage Photo ink and Colored the image with Copic Markers.
The Second holiday card I made uses the Scallop On the Edge die on the Decorator paper from Memory Box. Then I cut the Scallop with dots out of Bazzill's Chili paper for a border. Then I cut another strip of Chili paper to use as a "ribbon" for the spellbinder's Fancy Tags. I stamped the Meadow Birds with Memento Dew Drop ink pads. Then over stamped with the Peace background, also from Memory Box, then distressed and layered. These were fun to use...check out how I used them in the next posting with Halloween stamps!!!
On the Edge...part 2
Here are some more cards using the Tim Holtz On the Edge dies. This time I used them with the Memory Box's new Halloween stamps...Let's take a look! This card uses the Ornate On the Edge die. I used both borders on the die. First, I cut the more elegant border out of Memory Box Blackbird paper. I cut out of the same paper a 2 1/4" strip and stamped the birds in flight on that piece. Then I use the ScorBug to faux stitch each side of the strip. Both of these pieces, I used the Vintage Photo Distress Ink to darken the edges of the orange paper. I cut out the other border on a strip of brown cardstock. On the card front, I stamped the Vintage Scroll with dark brown ink. Then I layered all the pieces on the card. I stamped the Blackbird in flight on cream cardstock, then stamped the spooky background over the top with brown ink. Distressed the edges and layered.
 This second card I did, uses the File Tabes die. I used the borders on each edge of the card. I decided to have it open just like a file folder would open. Using more of the Memory Box decorator paper, I stamped the bird on the fence on one piece and embossed the larger piece with the new Tim Holtz Collage Texture Fades folder and then sanded it. The piece seemed too "white" after I sanded it, so I rubbed some of the Vintage Photo ink over the sanded paper. Because the inside tab was showing on the outside of the card, I decorated the inside as well. You can see that below!
 There isn't a lot of samples of these On the Edge dies out online, so I hope this will help inspire you to get them out, dust them off and create, create, create!!!
 This card uses the Ornate On the Edge die. I used both borders on the die. First, I cut the more elegant border out of Memory Box Blackbird paper. I cut out of the same paper a 2 1/4" strip and stamped the birds in flight on that piece. Then I use the ScorBug to faux stitch each side of the strip. Both of these pieces, I used the Vintage Photo Distress Ink to darken the edges of the orange paper. I cut out the other border on a strip of brown cardstock. On the card front, I stamped the Vintage Scroll with dark brown ink. Then I layered all the pieces on the card. I stamped the Blackbird in flight on cream cardstock, then stamped the spooky background over the top with brown ink. Distressed the edges and layered.
 This second card I did, uses the File Tabes die. I used the borders on each edge of the card. I decided to have it open just like a file folder would open. Using more of the Memory Box decorator paper, I stamped the bird on the fence on one piece and embossed the larger piece with the new Tim Holtz Collage Texture Fades folder and then sanded it. The piece seemed too "white" after I sanded it, so I rubbed some of the Vintage Photo ink over the sanded paper. Because the inside tab was showing on the outside of the card, I decorated the inside as well. You can see that below!
 There isn't a lot of samples of these On the Edge dies out online, so I hope this will help inspire you to get them out, dust them off and create, create, create!!!
Another take on Mr. Hoppy!
 My mom stamped this Hoppy Guy. Using the Mega Oval Spellbinders to cut out the sentiment, then tucked the cattails behind it. Then she stamped the dragonflies and colored them with Copic Markers. Then overlaying the wings with crystal glitter...really makes them pop! All the stamps are Stamp Shoppe Creations stamps. Using the new "Dots" Cuttlebug folder to emboss the light yellow paper. *HINT* If you use this folder on white paper and flip it over, it makes a great golf ball paper!!! Hoppy Stamping :)
Thursday, July 8, 2010
"Hoppy" Day...
 Here is the sketch for the Midnight Madness Sketch Challenge #61. I chose to do the fancy sketch. See my take on the sketch below:
 I used the Stamp Shoppe Creation's Hoppy Frog from our just released, new images. Then I only stamped part of the "Hoppy" day sentiment on the light green tab. My cattails then were stamped and cut out to pop in front of the jumping frog. (I cut these cattails out for my good friend Michelle...I knew she would appreciate it :) Papers were from October Afternoon and the pearls are from Memory Box. I decided to used the Labels 10 from Spellbinders to fancy up the ovals. Hope you are having a "HOPPY" day!!
Wednesday, July 7, 2010
Going Bananas!
 What a crazy summer! I feel like I am going bananas!! I did a two-in-one challenge today. I started with the Mojo Monday sketch challenge and then used the "Let's get fruity!" challenge from Cute Card Thursday. The background paper is from Creative Imaginations, Monkey and branch are my Stamp Shoppe Creations stamps and the banana is from High Hopes. All images are colored with Copics. I used my new ScorBuddy from ScorPal. That cute little tools is perfect for card makers and doesn't take up much room. It also comes with it's own carrying case. There are markings every 1/4th inch and at each end there are markings every 1/8th inch. So I scored my green strip of paper at the 1/8" marks and used the scor bug to create faux stitches using the 1/8" marks as well. I used the tree boughs as one of the 3 strips from the sketch. Happy Creating!!
Subscribe to:
Posts (Atom)


